Friday, August 31, 2012

Fat Quarter Friday: Sweetie Pie Bow

I love the bold look of this sweet bow. I based my bow off of this tutorial from Sutton Grace (whom I miss) and used my own baby headband tutorial.
 
Materials:
1 fat quarter
hot glue gun

Step 1: Cut a rectangle out of your fabric. For my bow that ended up being about 3" long and 2" wide (at the widest part), I cut my rectangle to be 3.5"x6". If you want a bigger bow, cut a bigger rectangle.
Step 2: Fold the rectangle in half hamburger style with the right sides together and sew around the open edges leaving about a 2" opening to turn. Trim your corners.
Turn the rectangle right side out and press with the iron. Slip stitch the opening closed.
Step 3: Now we're going to make the little band that will go around the middle of the bow. Cut a small strip of fabric, I did 2.25"x3.5". I didn't like how wide this made the band for my bow, so I adjust for that later on.
Fold it in half hotdog style and sew along the long end so you have a narrow tube.
Turn the tube right side out and press the seam to the back.
I didn't like how wide this made the strip, so I folded it in half and kept it in that position by putting a strip of hot glue in the crease. I'm sure there's a better way to do it, but I just went with the flow.
Step 4: Take your rectangle from step 2 and accordion fold it to your liking.
Try a couple different numbers of folds to see what you like. Then pinch in the center.
Step 5: Place a dab of hot glue on the end of the narrow strip from step 3 and place it on the pinched part of your bow. Hold it for a few seconds to let it set.
Wrap the strip around, putting hot glue under it as you go. If you're wanting to attach this to a older girl's headband, you can glue the headband under the narrow strip as you go. When you get back to where you started, trim off the excess. I didn't like the raw edge, so I did a tight and narrow zigzag along it.
Finally glue it in place!
You're done with the cutest bow ever!
Now, you can attach it to whatever you want to embellish, I wanted another headband for Ada, so I whipped up one of my t-shirt headbands and hot glued the bow to it. Viola!
 Doesn't she look cute?!

Tuesday, August 28, 2012

Nifty Thrifts

Here are some more wonderful thrifty finds! These Little People sets were picked up at a garage sale: Noah's Ark for $6 and the dinosaur set for $8. This is more than I would usually spend on toys for Ada, but they're so darn cute and new they're crazy expensive (like $30-$40 per set). The ark set is currently her favorite toy, she likes to throw them down the stairs one by one (not two by two unfortunately).
I was never a big beanie baby fan, but these were only $0.50 each, and I couldn't resist the unicorn...
Now for the good stuff, (both of which I plan on painting sometime in the near future). This doll stroller was $3 and the car was $5.
Ada is madly in love with her car and asks to be pushed around in it multiple times a day. Sometimes she laughs hysterically, and sometimes she just sits very still and silent.
The video isn't great quality (because I shot it), but it's still really cute.

Sunday, August 26, 2012

Weekend Sweets: Cranberry White Chocolate Oatmeal Cookies

This week I've been hankering for fall, pumpkins, corn mazes, crunchy leaves, and tasty treats spiced with cinnamon. School started this week and that's my trigger, I automatically switch from summer to fall mode, and there's no going back (even if we had a few days still in the 90's this week). In honor of fall and all things delicious, I made these Cranberry White Chocolate Oatmeal cookies, inspired by this recipe. They are the perfect combination of crunchy and chewy, sweet and spicy. I ate 10 the day I made them...don't tell Brian...
Ingredients:
1 stick butter (softened)
1/2 C brown sugar
1/2 C sugar
1 egg
3/4 C wheat flour
1/4 t baking powder
1/4 t salt
1/8 t nutmeg
1/4 t cinnamon
1 1/2 C quick oats
1/2 C dried cranberries (I used craisins)
1/2 C white chocolate chips

Step 1: Preheat your oven to 325. Cream together your butter and sugars. Once they're creamy, add the egg and mix.

Step 2: In a separate bowl, mix your flour, baking powder, salt, nutmeg, and cinnamon together. Add to the butter mixture and mix well.

Step 3: Finally add in the oats, craisins and white chocolate chips. The mixture is going to be somewhat crumbly, don't fret, that's normal.

Step 4: Take some sort of scoop and press the mixture into little compact cookies lumps. Place them on a greased pan or if you have parchment paper use it. Once your little dough lumps are in position, flatten them slightly with the palm of your hand. These cookies do not spread out and flatten in the oven, so you need to help them out a little.

Step 5: Bake for 18 minutes at 325. Important: let the cookies cool on the pan, don't try to move them while they're still hot!

DIY Steampunk Costumes

For our trip to GenCon we decided to make our own steampunk costumes. We wanted to do them well enough so that we didn't look pathetic, but we also didn't want to spend very much money. Pretty much everything was handmade or thrifted. Why steampunk? Well, we wanted to dress up, but we wanted to do something that we could all do so that we didn't end up as the dysfunctional family of the Flash, a tavern maid, and a baby Yoda. Also, Brian likes steampunk, so there.
The star was definitely Ada, everybody wanted a picture of The Steampunk Baby!
I made her dress using my onesie dress tutorial, but added an extra ruffle to the bottom. Then I just handsewed on three buttons to the onesie.
The baby goggles and just a headband made of some knit fabric from an old t-shirt (I didn't follow my headband tutorial exactly, but close enough that you get the idea). We then painted some caps from milk cartons and hot glued them on. Done.
Then for her shoes I used a pattern from the Baby Times book. They are pretty much the easiest and cheapest things ever to make, you just need one piece of felt and some ribbon. They look super adorable, but Ada hates shoes and socks, so she didn't wear them long, unfortunately.
The ensemble would not have been the success it was without the steam powered stroller.

We picked up this little horror at a thrift store for a few bucks.
We took off the seat and gave it a healthy dose of spray paint. We did a black base coat before we did the bronze so that it we didn't have any electric blue shining through. Brian went though and put a little shiny silver on all the little rivets and then painted the wheels black.
We traced the old fabric seat and made a new one out of lightweight broadcloth. We spray painted the clips and made new straps out of this weird fabric belt stuff. We also wrapped the handles and footrest in cheap pleather that we attached with heaping dollops of hot glue.
We whipped up a little fabric bag that velcroed on to the bottom of the stroller. We also made some silly little "pistons" out of dowels and wrapped some garden wire we had lying around around them to look like springs.
As a last minute addition, we attached an exhaust pipe to the bag, which really made the stroller look fun and more steampunkian. We used two cheap elbow pipes from the store and hot glued them into the position we wanted. Then Brian drilled some tiny holes in the base and I hand stitched it to the bag. It's also tied with a cord to the back to help it stand up.
Our diaper bag was just an old bowling ball bag that we got from the thrift store and added a strap to. I also hot glued this weird medallion thing to it to give it some personality.   
 
Then the goggles. I can't take any credit for these, Brian did them all. He made up the design and used pretty much only yogurt containers and cheap pleather.
 
 He cut the heads off of screws and then glued them on.
He wanted to make them fit comfortably without having to adjust them, so he added hidden elastic inside that wide brown strip there. He is quite the genius when comfort is involved.
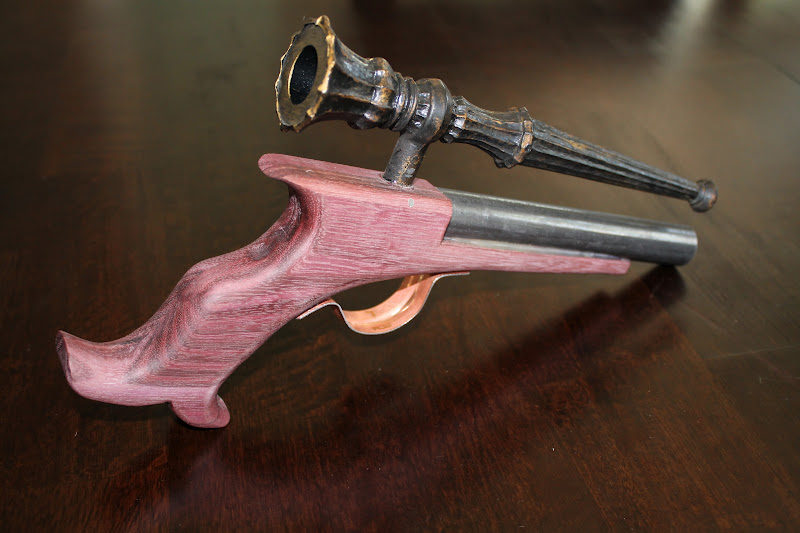
Our costumes weren't really complete without our freaking awesome pistols. As kids, my siblings and I were never allowed to have toy guns (squirt or nerf), so having one as part of my costume was a taboo that made my inner child squirm with guilt and delight!
 
Brian made both of these using some blocks of maple (the white one) and purpleheart (the purple one) that he cut out. We both worked together with rasps, files, saws, and sandpaper to make the handles, and the rest is just parts from the thrift/home improvement store. He made up the design, but based it on some antique saws that he has. Here's Brian's pistol (the claw is a mystery from that portion of the thrift store labeled "Bric a Brac")
 
My pistol
 
Here's Brian in all his glory. He picked up the shirt at a thrift store and altered the collar so that it was rounded and then starched and ironed it to his liking. He already had the hat and the bow tie which he made (and wears to work). He made the pants using a pattern and then attached suspenders (which he also made) to them. The vest (which isn't in this picture) he already made from a pattern that he made up several Halloweens ago. He's a handsome devil.
Here's me! I made the skirt and coat (which isn't in this picture) from a pattern and I already owned the corset (which I know is weird, but whatever). The skirt has about 1 million pleats at the bottom, which took awhile, but looks good and makes it really fun to wear (twirling anyone?). I picked up the belt from a thrift store and I already owned the necklace (a gift from my brother) that I spray painted (sorry Connor).
Don't we look smashing?

Saturday, August 25, 2012

Crazy Ribbon Lady

So it's official, I'm a crazy person.
I bought my first wholesale order of ribbon, and it's rather frightening. It's a little hard to tell from the picture, but those bottom spools are about 8"-9" in diameter and are 100 yards. Yikes. If you too are a crazy person and want/need absurd amounts of ribbon, I got mine at Ribbon Retreat.

Friday, August 24, 2012

Fat Quarter Friday: Wrap Tie Bracelet (How to turn a skinny tie)

I made up this cute little bracelet by mistake. I had made this tie for a project and then discarded it in favor of another. Not one to waste things, I tied it around my wrist and loved how it looked, hence this bracelet was born. This is also a tutorial for making a thin turned tie.
Materials:
1 fat quarter
Large needle
Strong thread

Step 1: Cut your fat quarter into strips, 1"x22". You can cut as few or as many strips as you like. The first bracelet was made from 3 strips and the second from 4. The first wraps around my wrist nine times while the second wraps around twelve times. It's all up to you.
 Step 2: Sew the strips end to end, right sides together. Iron the seams open.
 Step 3: With right sides together, sew the long ends together using a 1/4" seam. At this point you can trim up near to the seam if you wish (this will make turning easier), but I left it. I like how it makes the tie a little fatter.
 Step 4: Take your large needle and long piece of thread (I did 80", but it doesn't matter too much) and tread the needle so that you've got a double thread going on and make sure it's tied through the eye of the needle and not loose. Put a big knot at the bottom and push the needle through the seam on one end of the strip.
 You can see how I've put the needle through the spot again so it's got a tight loop hold. Now take the needle and thread it through the tube. Pull and gather up the tube until you get the needle out the other end. Then you can work to turn the tube right side out. Help get the end with the knot in it started by pushing it in on itself with something pointy like a knitting needle.
Step 5: It takes doing it once to get the hang of it, but then it's super easy. Finish turning the tube right side out. Tie the two ends together in a tight knot.
 Loop it around your wrist and admire your cute new bracelet!
 I love how comfortable they are! I love bangles, but they end up hurting my wrists; these feel like nothing at all!