I haven't posted a weigh in since March, so I thought I should to show that I'm doing my best to maintain my weight. We went on vacation earlier this month and I went a little crazy and gained some weight, but when we got back home I got back on the wagon and lost it. I have this bad habit of finding little excuses to overindulge like "Brian had a hard day at work," "I'm on vacation," or "it's 10 o'clock on Wednesday." It's something I'm working on...
On another note, I did something crazy (well, crazy for me) and dyed my hair a dark red, so I figured I'd better post a picture of that. I've never dyed my hair before, except for highlights, so this is totally new for me. Brian loves it (he apparently has a thing for redheads) and I think I like it. I can't decide if I don't love it because of the color or because I don't like the length my hair is right now. I want to go cut my hair so bad it's physically painful for me, but I'm pushing through. Someday I will have hair long enough to put in a ponytail!
Previous Weight: 145 lbs
Current Weight: 144 lbs
Monthly Weight Loss: 1 lb
Total Weight Loss: 69 lbs
Saturday, June 30, 2012
Quick Baked Maple Apple
This is a great sweet treat for those who are trying to watch their calories. I got this recipe from the Biggest Loser, but it's actually really good and easy and you can make it with stuff you have lying around, unlike some of the other BL recipes. This totally satisfies your sweet craving with minimal calories! (Which is important this week because I totally ate way too much of the peanut butter fudge I made last week!)
Ingredients:
1 apple
cinnamon
sugar free maple syrup
Step 1: Cut your apple in half (leave the skin on) and cut out the core with a knife. Place the two halves in a bowl and cover with plastic wrap. Microwave on high for 2 minutes.
Step 2: Drizzle maple syrup on the apple halves and sprinkle with cinnamon. You can eat the apple with a fork, but I just picked it up with my hands and ate it in all it's sticky syrup glory!
Friday, June 29, 2012
Fat Quarter Friday: Snack Bags
This week I made some reusable snack bags. These are perfect for dry snacks like cheerios or goldfish, and not so much for wet snacks like apple slices. They are however machine washable, so after you use them, just toss them in the wash! I used the tutorial from CraftyStaci with some of my own changes and additions. One fat quarter will make two sandwich size bags and two snack size bags. If you go to CraftyStaci's tutorial, she also gives you the dimensions for a quart size bag.
Materials:
One fat quarter
1/4 yard ripstop nylon (it was near the muslin at my Joann's)
26" of velcro
Ribbon (optional)
Step 1: Cut your fabric and velcro.
Snack size bags:
fat quarter and nylon: 8 1/2" x 7" - cut two from each fabric
velcro: 6 1/2" long (I used 5/8" width, but you can use any width you want)- cut two sets
Sandwich size bags:
fat quarter and nylon: 14 1/2" x 7" - cut two from each fabric
velcro: 6 1/2" long (I used 5/8" width, but you can use any width you want) - cut two sets
Step 2: Take your velcro and center it along the 7" long edges 1/2" away from the edge on your nylon. Stitch in place. Repeat for all of your pieces of nylon.
Step 3: Fold your nylon in half hamburger style with the velcro sides together and sew along the two sides with a 1/4" seam leaving a 2" gap on one of the edges. I used a zipper foot on my machine to help me get nice and close to the velcro. Fold your fat quarter fabric in half with the right sides together and sew down the sides with a 1/4" seam. Repeat with all your pieces.
Step 4: Turn your nylon bag so to the velcro side is out and put it in corresponding fat quarter bag that is still right side out.
Step 7: Now you can turn your bags right side out. Sew your opening in the nylon closed. I used a small tight zigzag.
Materials:
One fat quarter
1/4 yard ripstop nylon (it was near the muslin at my Joann's)
26" of velcro
Ribbon (optional)
Step 1: Cut your fabric and velcro.
Snack size bags:
fat quarter and nylon: 8 1/2" x 7" - cut two from each fabric
velcro: 6 1/2" long (I used 5/8" width, but you can use any width you want)- cut two sets
Sandwich size bags:
fat quarter and nylon: 14 1/2" x 7" - cut two from each fabric
velcro: 6 1/2" long (I used 5/8" width, but you can use any width you want) - cut two sets
Step 3: Fold your nylon in half hamburger style with the velcro sides together and sew along the two sides with a 1/4" seam leaving a 2" gap on one of the edges. I used a zipper foot on my machine to help me get nice and close to the velcro. Fold your fat quarter fabric in half with the right sides together and sew down the sides with a 1/4" seam. Repeat with all your pieces.
Step 4: Turn your nylon bag so to the velcro side is out and put it in corresponding fat quarter bag that is still right side out.
Line up all the edges and you can pin it in place if you want.
Step 5: This step is optional, but I think it makes the bags cuter and easier to use. For each bag, cut two strips of ribbon 1 1/2". Fold them in half and sew 1/8" away from the edge to turn them into little loops.
Take your loops and position them centered on the sides of the layered bags. You're going to slip the loops loop side down in between the two layers.
Pin the loops in place.
Step 6: Now we're going to sew the layers together. Again, I used the zipper foot on my machine to help me get close to the velcro. Sew 1/4" away from the edge. Make sure to sew the ribbon loops in place as you go.Step 7: Now you can turn your bags right side out. Sew your opening in the nylon closed. I used a small tight zigzag.
Now smoosh the nylon bag into the outer bag and topstitch around the top near the velcro about 1/16" away
from the edge.
You're all done! I made the bag in the upper left without any ribbons so you could see what it looked like, but I think they look a little more complete with them.
You're all done! I made the bag in the upper left without any ribbons so you could see what it looked like, but I think they look a little more complete with them.
Snack away!
Tuesday, June 26, 2012
Jean Quilt - Outdoor Picnic Quilt
Ok, I know, you're thinking "eww, why would you want a jean quilt?" Well, I had a bunch of old ripped up jeans taking up room in my stash and thought they would make a nice durable outdoor quilt, perfect for summer picnics. I have lots of other cute quilts, but I feel guilty taking them outside, hence the jean quilt was born. This blanket is also great because it's fairly heavy and thick, so you don't feel all the pokies that you normally would out in the grass. Overall, I spent less than $17 on this quilt which I think is pretty darn good and it was quick to make.
Materials:
A bunch of old pairs of jeans
Some quilt batting
About 4.5 yards of flannel for the back and binding
Step 1: Acquire a bunch of junky pairs of jeans. You can stock up on your own when they wear out, or you can pick some up at garage sales. We did a combo, we used some of our own and we picked up a couple at a rummage sale for $0.10 each. Cut off the hems and tops so you're left with these flat pieces (you'll get four flat pieces from each pair).
Cut out a bunch of 8"x8" squares. We did 99 of them. You can make your squares any size you want and make your quilt as big or small as you want, but this size turned out perfectly for us. You can include pocket pieces in these if you so desire.
Step 2: Arrange them in a way that is pleasing to you, or do it randomly like I did. Sew them all together, making sure to iron your seams to the side.
When your whole top is put together, use a measuring tape to find the dimensions of your top. Measure in the middle both ways since it's less likely to have stretched weirdly in the middle. Mine measured roughly 68"x83".
Step 3: Now we're going to cut our backing. I used flannel because it's cheap (we got it for $2.79/yd), soft and fairly durable. My flannel was 44" wide, so I cut two strips that were 68" long and then cut them both to be 42" long and then sewed them together so that they ended up being 68"x83".
Step 4: We're now going to layer our quilt pieces. Put your top right side down, then put on your batting and then your backing right side up. Trim off any excess. I found it helpful to put little weights around the quilt as I trimmed to help everything stay in place.
Then pin your layers together. Go ahead and do a quick basting stitch all the way around your quilt with a 1/4" seam to hold everything together. At this point, you may want to sew the layers together in the middle as well. You could could stitch in the ditch around the jean squares, or you could pick several places and just tack it down by repeatedly doing a forward stitch than a back stitch until it's secure.
Step 5: It's binding time. If you made your quilt to be the same size as mine, you'll need over 300" of binding (68+68+83+83=302) so you'll need to cut 7 strips, each 2.5" wide. If your quilt is a different size, add up how long the sides are and then sew together your strips until they are a little longer than that.
Sew your strips together and iron your seam. If you're a fancy quilter you're probably not happy with my straight seam here. Quilters sew their binding strips together with a 45 degree angle, but I didn't want to, so if you want yours to look fancier, there's a good tutorial here.
Iron your strips in half with the rights sides facing out.
Step 6: We're going to sew the binding on to the quilt now. Take your binding and lay it out on the edge of your quilt (which is right side up) so that the raw edges line up perfectly. Start sewing about 5" away from the beginning of your binding strip. Sew with a 1/4" seam.
When you come to a corner, stop 1/4" away from the end, backstitch, and pull off the machine.
Pull the strip back so it is perpendicular
and then fold it over on itself so that it lines up perfectly with the edge of the quilt again. Pin in place and then begin sewing again on the new edge 1/4" away from the edge.
Step 7: Keep sewing around the quilt until you get close to where you started. Stop sewing about 8" from where you started sewing. Trim your loose binding ends so that when they lay on top of each other they have about 1/4" of overlap.
Fold them wrong sides together, pin, and then sew in place.
Finger press the seam open and test fit it. If the binding is too big and floppy, sew a bigger seam, if it's too tight, undo it and take a smaller seam. Once it fits right, sew the rest of it down.
Step 8: Fold the edge of the binding over the raw edge of the quilt on to the back and pin in place. Make sure that you're pulling it over tightly, it should cover your basting stitch.
Continue around the whole quilt, folding the corners neatly over themselves like so.
Step 9: There are a few different ways you can do the final seam, but here's how I chose to do it. With your jean side up, you're going to stitch in the ditch, which means right where your jeans and binding meet. This will hide your seam on the front. Make sure that you pull out the pins from the back as you go and that your stitch is catching the other side of the binding on the back.
You're all done, now go out and picnic!
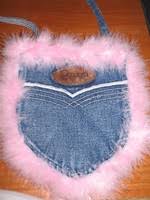
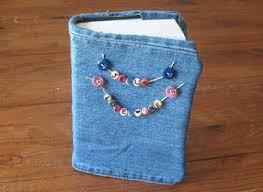
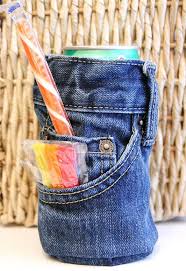
Just for fun, here are some other "interesting" denim things you could make!


Sunday, June 24, 2012
Weekend Sweets: Peanut Butter Fudge
Who says it needs to be Christmas to make fudge? Not me. This peanut butter fudge recipe from Just Because I am Me is A-M-A-Z-I-N-G (and really easy). I've tried around ten different recipes from her blog, mostly dinner stuff, and they've all been so freaking good! Go check out her blog for tons of deliciousness.
The original recipe doesn't call for chocolate, but I thought "What's better than peanut butter? Peanut butter and chocolate!" so I added some chocolate for an extra dose of gluttony.
Ingredients:
1 18oz jar crunchy peanut butter
1 7oz jar marshmallow cream
2 C sugar
2 C brown sugar
3/4 C milk
Some chocolate chips (optional)
Step 1: Empty the entire contents of your peanut butter jar and your marshmallow cream jar into a bowl and mix them together. Set them aside for a minute.
Step 2: Put your sugar, brown sugar, and milk in a pot and heat on the stove. Stir continually until the sugary stuff comes to a boil. Boil for 1 minute.
Step 3: Take the boiling mixture and pour it into the bowl with the peanut butter marshmallow mix and mix it up until everything is nice and combined.
Step 4: Pour everything into a greased baking sheet pan for thinner fudge or a 9x13 dish for thick fudge. If you're feeling extra sweet, while the mixture is still hot, sprinkle on a few chocolate chips. The heat from the fudge will start to melt them and when then get gooey, you can spread them out on the top. Enjoy!
Saturday, June 23, 2012
Headbands from T Shirts
I was getting a little tired of people saying "what a cute boy you have!" so I decided to make little Ada some comfy headbands. I know you can buy these for cheap, but them seem to pinch her head, plus, mine are cuter.
Materials:
Some old shirts
Hot glue
Optional for wide headband: serger
Depending on your baby's age, or if they have a abnormally big/small head, you will want to adjust the length you cut your strips, but I think these measurements are fairly accurate.
0-3 months: 12"
3-6 months: 14"
6-12 months: 16"
Step 2: Fold it in half hot dog style with the right sides together. Sew along the long edge.
Step 2: With your serger do a tight lettuce edge along both of the short sides of your rectangle.
Materials:
Some old shirts
Hot glue
Optional for wide headband: serger
Depending on your baby's age, or if they have a abnormally big/small head, you will want to adjust the length you cut your strips, but I think these measurements are fairly accurate.
0-3 months: 12"
3-6 months: 14"
6-12 months: 16"
The Narrow Headband
Step 1: Cut out a strip of fabric from your shirt. For this narrower headband, cut your strip 3" wide by the length from the chart above for your little one. I made mine 3"x16".Step 2: Fold it in half hot dog style with the right sides together. Sew along the long edge.
Turn your tube right side out. Iron the seam to the center of the back.
Step 3: Bring the two ends around to meet each other, making sure not to twist the headband. Stick one of the ends inside the open edge of the other one about 1/2". Fold the edges of the outside edge under about 1/4" so that the raw edge is not showing. Now you can sew them in place right about 1/8" away from the folded edge.
Make a cute little flower to put over the seam. I used my shabby rose tutorial.
Hot glue the flower over the seam. You're done!
Here's another variation on this same tutorial. I used my peony tutorial.
The Wide Headband
Step 1: Cut out a strip of fabric from your shirt. For this wider headband, cut your strip 5" wide by the length from the chart above for your little one. I made mine 5"x16".Step 2: With your serger do a tight lettuce edge along both of the short sides of your rectangle.
Fold your rectangle hot dog style with the right sides together. Sew along the long side of your rectangle.
Step 3: Turn your tube right side out. Lay it out flat and fold it in half so that the two lettuced edges are one on top of the other. Sew a gathering (basting) stitch (length 5) about 1/4"-1/2" away from the lettuced edges.
Pull the strings tight until the fabric gathers into a nice little flower. Tie in place and secure with fray check. All done!
Subscribe to:
Posts (Atom)