Monday, April 30, 2012

Flower Pillowcase Dress

You are a flower. Be the flower. Well, you're little one can be a flower anyway. I saw this very sweet flower pillowcase dress pattern and decided to make my own. You can purchase this pattern here.

 I think mine turned out pretty cute! I can't wait until Ada's big enough to wear it.

Sunday, April 29, 2012

Weekend Sweets: Oreo Pudding Cookies

These are decadent, ultra rich, and ooey gooey. Milk is a must. The recipe is from The Girl Who Ate Everything
Ingredients:
1 C softened butter
3/4 C brown sugar
1/4 C sugar
1 (4.2oz) package oreo pudding mix
2 1/4 C flour
1 t baking soda
2 eggs
1 t vanilla
1/4 t salt
2 (2.6 oz) Cookies n Cream candy bars
1 package chocolate chips

Step 1: Mix flour, soda, and salt. Set aside.

Step 2: Cream butter and both sugars together. Add in the pudding mix. Once mixed add your eggs and vanilla.

Step 3: Slowly add in your flour mixture from step 1 and mix until well combined.

Step 4: Break your candy bars into tiny bits (I went for dime sized pieces but wasn't too particular about it). I froze mine first and then hit them with my measuring cup, this seemed to work well for me, but you do whatever works best for you. Now stir in your candy bar pieces and your chocolate chips.

Step 5: Make little dough balls (about 1.5 inches) and lay them on a greased baking sheet. Bake for 8 minutes at 350. Make sure you don't overbake them, you want them to be soft and gooey.

Note: Let the cookies cool for a while (about 5-6 minutes) on the tray before you transfer them to a cooling rack or else they'll fall apart.

Friday, April 27, 2012

Fat Quarter Friday: Simple Camera Strap Cover

Brian gave me this amazing camera for my birthday. I LOVE the camera, but the strap wasn't really doing anything for me, so I decided to make a cover for it. I thought about making a new strap entirely, but this way I know it's strong, and if I get tired of the fabric, it'd be really easy to take it off and whip up a new one!
Materials:
1 Fat Quarter
Camera Strap

Step 1: Measure your camera strap from where you want the fabric to start and stop and how wide it is. Mine was 23 5/8" x 1 5/8".
Step 2: Add an 1 1/2"to the length (mine went from 23 5/8" to 25"). Now double your width and add about an extra 1/2" (mine went from 1 5/8" to 3 3/4"). We're going to cut out our fabric from the fat quarter. Since fat quarters aren't long enough to accommodate this project, we're going to cut two strips (mine were 12 1/2" x 3 3/4").
Step 3: Place your two strips right sides together and sew along one of the short edges so you now have one long strip. Iron your seam.
Step 4: Fold your strip in half, right sides together and sew along the long edge.
Step 5: Turn your tube right side out and iron the seam so that it's on the back of the strip.
Step 6: Slide your cover on to your camera strap. It should be a nice snug fit.
Step 7: When you get to the end, fold under the raw edges of the tube of fabric at least 1/4".
Using a zipper foot on your machine, sew it in place as close to the edge as possible about 1/16". Now pull the fabric taut to the other end and fold under the raw edge. Again sew with your zipper foot about 1/16" from the edge.
It's complete! Enjoy your new fabulous camera strap!


Wednesday, April 25, 2012

Ready, Set, Nerd! Quarriors Replacement Dice Bags - Gaming Draw Bags

So something I haven't shared on this blog is quite how nerdy my husband and I are. One of the geeky things we like to do is play board games, if fact we have a whole bookshelf that is overflowing with board games. We recently got this new game called Quarriors which is like deck building games, but with dice. It's a lot of fun, but the draw bags it came with totally suck, so we made some new ones that are much better! I used the same exact method I did for the scrap bag from my puff pin cushion tutorial. They turned out to be the perfect size and shape, plus they stand up on their own which is really nice. If you want to make your own, they are super quick and simple, even my husband can make them; go here for the tutorial (you only need to follow the first part minus the button).
Old Bags: Weird velvety tarp material with tiny openings.
 New Bags: Awesome fabric, wide openings, and bags stay up on their own!
And don't worry, they squish down to fit in the box!

Tuesday, April 24, 2012

Make Your Own Baby Food

We've been making our own baby food here, and it's actually really easy. I thought it'd be kind of a hassle and I wasn't sure if the money we would be saving would be worth it, but it totally is! I've been looking here and here for ideas and tips. We started with a baby favorite, sweet potatoes.

Step 1: Wash and stab a few times with a fork. Wrap in tin foil and bake at 400 for 45 minutes or until soft.
 Step 2: Once cool, cut in half and scoop out all of the meat. Put in a blender with a few ounces of breast milk, formula or water, your choice and blend until smooth. Add more or less liquid to get a good consistency.
 Step 3: Scoop your puree into a clean ice cube tray. Cover with saran wrap and freeze.
 Step 4: Transfer from the tray to a freezer safe bag.
 When your baby's ready to eat, just pop one of your food cubes into the microwave for a few seconds (ours takes 20) and serve! Yum!

Sunday, April 22, 2012

Weekend Sweets: Blueberry Custard Crunch Pie

For Brian's birthday last weekend, I made this delicious blueberry pie. We're not big on cake here, so birthday pie is where it's at. With all the fresh blueberries and light flavor, this pie is perfect for summer and is almost guilt free. Well compared to the other pies I was looking at making which were around 900 calories a slice and this one is only about 300 calories a slice, yum! I found the recipe on allrecipies.
Ingredients:
8 oz light sour cream
3/4 C sugar
1 egg
2 T flour
2 t vanilla
1/4 t salt
2 1/2 C fresh blueberries
1 unbaked pie crust (9 inch)
Topping:
3 T flour
2 T sugar
3 T chilled butter (chopped into small bits)
4 T chopped pecans
Step 1: Preheat oven to 400 degrees F
 Step 2: Mix sour cream, sugar, egg, flour, vanilla, and salt until smooth. Gently mix in blueberries. Spoon into the unbaked pie crust.
 Step 3: Bake for 25 minutes. 
Step 4: Prepare the topping. Mix the flour, sugar, and chilled butter (use a hand held pastry blender) until crumbly. Fold in the pecans.

Step 5: After the pie has baked for the 25 min, sprinkle on the topping and bake an additional 15-20 minutes


.

Friday, April 20, 2012

Fat Quarter Friday: Pillowcase Dress

This week I made a cute and summery pillowcase dress using the great set of tutorials from The Mother Huddle. This project is fun because you can make it for sizes from 3 months up to 6T, her handy dandy sizing chart can be found here.
 
Materials:
5 Fat Quarters (you can make it with less, but it looks best with five).
Some Ribbon for the Tie

Step 1: Using the sizing chart, cut out your pieces. You will have eight smaller rectangles (from four of your fat quarters) and two larger rectangles (from the leftover fat quarter). I made a size 6-9 month, so I cut eight dress panels 4"x13" and two large rectangles that make up the bottom at 5 1/2" x 22".
Step 2: Take your smaller rectangles and split them into two groups of four, one set for the front of the dress and the other set for the back. Sew each set of four together as shown. Iron your seams. Repeat for your other set of four rectangles.
Step 3: This step is optional, but gives your dress a nice finished look. We're going to now topstitch down each of the seams we just made. If you're not comfortable with topstitching, look here for some tips.
Step 4: Set your rectangle sets aside for a moment. Take your leftover larger rectangles and fold them in half hot dog style, right sides facing out and iron. Now take your front and back pieces and lay them out on your cutting board with the right side facing up. Lay your ironed piece like so and trim it so it's the same width as your sewn panels.
Fold the cut ironed piece up on the set of panels so that the raw edges are together. Pin in place and repeat with the other set of panels and ironed bottom piece.
Sew along the bottom edge. Then you can topstitch the seam if you want. Do it for the other set as well.
Step 5: Lay your front and back panels together with their right sides together. We're now going to trim the top corners to make the armholes. For the 6-12 month size I measured in 3" on the top and 3.5" on the side. Trim off the triangle on both sides.
Step 6: Take one of the panels and lay it face down on your ironing board. Fold down the cut edge you just made 1/4" and iron down.
Now fold the same edge down 1/2", iron and pin in place. Repeat with all four armholes.
Sew in place.
Step 7: Place the front and back right sides together and pin the sides.
Sew the sides together. Taking off more at the armholes and less at the bottom to create a slight A-line.
Step 8: Now we're going to make the casing for the tie. Take one of the top edges and fold it over 1/4", iron.
Fold the edge over again 1/2". Iron and pin in place.
Sew in place and repeat on the other top edge.
Step 9: Now take your ribbon, attach a safety pin to the edge and thread it through both casings.
You're all done! Tie an adorable bow with the two loose edges once on your kiddo.

Wednesday, April 18, 2012

Clear Rattles

When Ada and I went to our library's lapsit, they brought out the toys at the end, and they had these great clear tubes with toys in them to shake. Ada loved them, so I decided to make her some.
Materials:
Empty Crystal Light containers
Some small items from around the house
Heavy duty glue (non-toxic since babies like to chew)

Step 1: Drink a bunch of Crystal Light. Now take your empty containers and rip off the labels.
Step 2: Find some fun stuff to put inside them. I just looked around the house (in junk drawers and the like) and decided to put dice in one, colorful magnets in another, and bells in the third.
 Step 3: Put your item in their containers. Put glue around the inside rim of the lids and stick on the containers. I used E-6000, but any heavy duty glue will do. Make sure to use a tough glue because you don't want the lids to come off and and your baby playing with all the stuff inside. Can you say choking hazard? Also, I'm not sure the E-6000 was such a great choice since it smells like death and I'm pretty sure it's toxic. I guess I'll have to watch her like a hawk while she plays with these, so just make some new ones. I think that hot glue would work quite nicely.
 You're done! Hopefully you don't mind all the lovely rattling and jingling noises that are about to ensue.

Saturday, April 14, 2012

Nifty Thrifts

You say cheap, I say thrifty. My husband and I love to go thrifting, whether it be at garage sales, antique malls, or second-hand stores because really, who doesn't love saving money? I think it's so fun to see all the weird stuff people have and on occasion you find amazing cheap stuff! I thought I start sharing some of our finds.

We got 15 books in great condition for $7 (the cost of one children's book from Walmart).
 This popper was only $2 at Salvation Army, it goes for $15 on Amazon. It works great and all it needs is a little bath.
 This fun statement necklace was $1 at an antique mall near our house. It's really happy and bright, plus, who doesn't love a little costume jewelry?

Friday, April 13, 2012

Fat Quarter Friday: Amish Puzzle Ball - Baby Toy

This week I made an Amish puzzle ball. They're fun to look at and make great baby toys! Ada is rather fascinated with hers. I looked here to find out how to make one, it's easy if a little time consuming. It's a great project to do while watching a movie.
Materials:
2 or 3 fat quarters depending on what style you like
Needle and corresponding thread

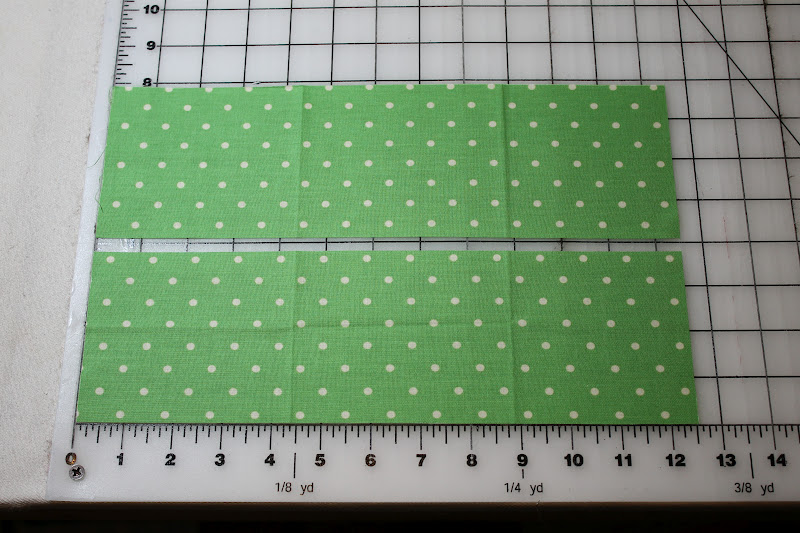
Step 1: Make a pattern from paper of an almond like shape roughly 2" wide and 4" long.
Cut out a total of 36 of these from your fat quarters. You can do three different fabrics, or two. I like the look of two better. If you're doing 2 fabrics cut 12 from one and 24 from the other, and if you're doing 3 fabrics, cut 12 from each.
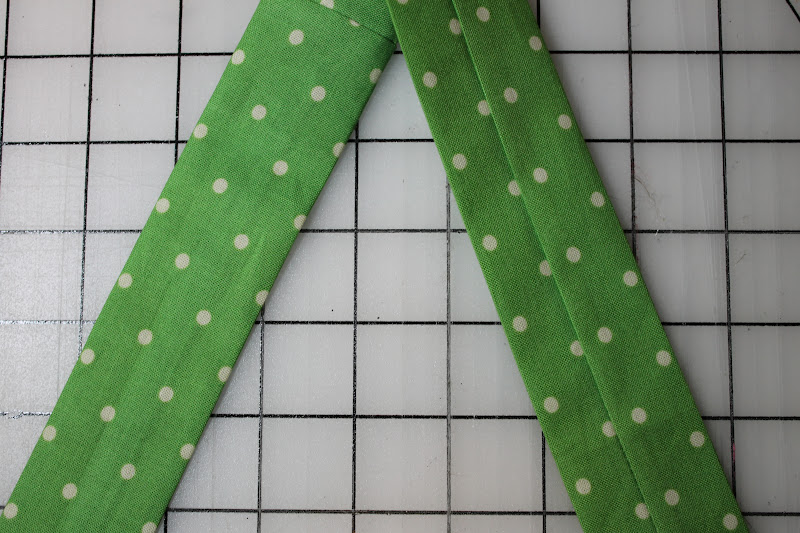
Step 2: Take one of your sets of 12 and place them right sides together on one of the other sets of 12.
Step 3: Sew one side of each football, but don't go all the way to the ends, leave a 1/4" (see red dots).
Open up your football you just sewed like so, and
place your remaining set of 12 fabric face down on top.
Sew along the edge that only has two fabrics layered together, not the one with four. Remember to sew 1/4" away from the edge (see red dots).
Step 4: Adjust the football so that two more of the unsewn edges are together making sure that everything else is out of the way and sew 1/4" away from the edges (see red and blue dots). make sure to leave an opening so you can turn it. My openings were very small and hard to deal with, so I recommend leaving 1 1/2" - 2" opening.
Sew up your remaining edge staying 1/4" away from the edges (dots).
Step 5: Turn your football right side out. Use a crochet hook or something similar to make your ends poke out.
Stuff it so it's nice and full and sew it up. Repeat until you have 12.
Step 6: Take two of your shapes and sew two of their ends together. For the rest of this project, make sure you use several stitches to make sure your ball is sturdy and won't fall apart when it's been played with a bunch. (You can double your thread, so it's like doing two stitches at once and saves you time.)
Then sew another one on so you have three. Then sew the two far ends together to make a triangle (see black dots). Repeat until you have four triangles.
Step 7: We're now going to assemble the ball. Take two of your triangles and sew two of the points together like so.
Then sew on another one on the other side so you have three connected in a line. Arrange your triangles like so and now you're going to sew the two points markered with black dots together.
 You can now sew on the last triangle. You will sew it's three points on to the points marked in green in this picture.
You're done!
You can spin the pieces around so another color is on top.
This makes a great size toy for little hands. It works great as a ball, it rolls really well and is easy to catch, plus it tastes great!