Friday, August 26, 2011

Fat Quarter Friday: Book Cover

Lately I've been trying to cook more, so that means looking at my recipe book more. Only, my recipe book is a nasty photo album from the dollar store - not very attractive. So, I decided to dress it up. One of my favorite parts of going back to school was covering textbooks in paper bags. I used the same pattern, only with fabric!
Materials:
Book you want to cover
1 Fat quarter
Hand sewing needle and thread
Felt, tacky spray, and embroidery thread (optional)

Step 1: Take your fat quarter, iron it, and give it a nice clean 1/4" hem all the way around. (I fold mine under twice so it looks cleaner.)
 Step 2: Lay out your fabric wrong side up and fold the top and bottom in toward the middle until your fabric is about 1/4" bigger than your book. There needs to be at least 2" of extra fabric coming past the sides of your book. Also, make sure the book is centered on your fabric.
 Step 3: I wanted to put a little felt applique on the spine of the book, so I printed out some letters to use as a guide. I then used the tacky spray to get them to stick to where I wanted them while I sewed them on with the embroidery thread.

 Step 4: Now we're actually going to attach the cover to the book. This part was hard to take pictures of, but it's really pretty easy. When you've got your book laid out on the fabric like in step 2, you're going to pick one of the sides to start with and fold the extra fabric around the edge of your book. You want to slip the edge of the cover of the book into the little folded area of your fabric (think of it like a book jacket). To ensure that mine wouldn't slip around, I tightly tied some embroidery thread in between the two hemmed edged that showed up on the cover. You don't have to do this, but I found it to be helpful. Once you've got your one side done, repeat on the other side. You won't be able to do the embroidery thread thing on the other side, but that's ok.
 Step 5: Now when you close up your book it should look something like this. At this point I was a little worried that it wasn't secure enough, so I decided to hand sew the four parts around the book where the fabric comes together on the corners of the cover. You can see two of those corners in this picture. I tried to take a picture of me actually sewing that area, but my old camera can't focus in that close.
 Now you're all finished! Although I think it looks a million times better than it did, I think that the felt word on an already busy pattern makes it a little hard to look at, but at least it doesn't say photos on it anymore!


Friday, August 19, 2011

Fat Quarter Friday: Change Purse

This week I decided to make a change purse for Fat Quarter Friday. I know change purses are a little useless since everyone uses debit or credit cards, but it's actually the perfect size for your cards and cell phone. Plus, the real reason I wanted to make one is because it uses fusible interfacing which I have never used, so I thought it'd be a nice little project to learn on. Also, who doesn't need more practice with zippers? I know I do, I'm terrible at them.

Materials: 
1 fat quarter
Some fusible interfacing
1 zipper

Step 1: Cut out four equal sized pieces. I cut mine 4" x 5". If you wanted to you could actually make about four little purses from one fat quarter, I however am just making one. Also, it's super cute to make the lining out of a different fabric, but I'm just using the same for the outside and the lining.
 Step 2: Fold one of the long edges under 1/4" and press, do this on all four pieces. Then, cut out two pieces of the fusible interfacing to fit the new size. I cut mine to be 3 3/4" x 5". Place the interfacing shiny side down on two of your four pieces (which ever two are going to be your lining). Make sure you place the interfacing under the folded part you just ironed. Now press with the iron until the stuff sticks. Super easy and cheap. Apparently you have to ask for the interfacing at the store because they keep it behind the counter. It took me a long time to figure that out.

 Step 3: Now take your zipper and one of your pieces with the interfacing and place the turned under edge right along the zipper (about 1/8" - 1/16" away from it). Make sure your zipper is about 3/8" in from the edge of your fabric. Pin and sew using a zipper foot. Do the same exact thing with the other side and then trim the edges of the zipper to be flush with the fabric. Pull the zipper about 3/4 of the way open and leave it there.


 Step 4: Fold the fabric right sides together and sew along the sides. I was having difficulty getting the seam started right on the zipper, so I actually made sure everything was lined up really well and started sewing from the bottom up to the zipper. This worked so much better for me. Sew both side edges and then the bottom edge. Once all the edges are sewn you can clip the corners and turn it right side out. You're done with the outside!


 Step 5: Now for the lining. Take your two lining pieces and place them right sides together. Sew along the three edges leaving the long edge with the turned under edges open. Clip the bottom corners and turn right side out.
 Step 6: Take the outside of your change purse and turn the zippered part down about half way. Place it on the table as shown. Take your lining and place it open edge on top. You're now going to slip the weird turned piece with the zipper into the lining piece. Only put it in about half way so that the top edge of your lining just about meets the zipper teeth. At this point you can decide to either hand sew the lining to the zipper or you can machine sew it. I don't mind hand sewing and it looks better, so that's what I did. Make sure to keep the fabric far enough away from the zipper so that it doesn't interfere with opening or closing.

 Step 7: Turn in right side out. You're done! It's pretty cute! Now you can put all your treasures inside. I put my really old and horrible phone in it!


So, I'm glad I made this little project, the zipper went well and the interfacing was really easy to use. Apparently the hardest part about interfacing is finding it in the store. I like the stability it gives to the bag, it makes it feel very sturdy, like it could actually hold change without ripping. Happy Friday!

Operation Mani/Pedi

Who knew that painting your own fingers and toes could turn out to be a workout. I decided to beautify my hands and feet today, um not the easiest thing to do when you're 9 months pregnant. Despite the odds my endeavor was successful, with only one smudge on my big toe. Hurray!

Also, I think I may have a nail polish obsession...

Thursday, August 18, 2011

Picture Frame Fix Up

I had this picture hanging up in my bathroom. You can't really tell too well in this picture but the frame has this sweet brass band all the way around which makes it really hideous. So, I decided to paint the frame.

 Here it is painted and hanging up in it's original spot above our tub. I thought I would be really pleased with it, but I'm not. So I thought I'd see how it'd look in our other bathroom. Eh, it's okay there too, but something about it looks wrong no matter where it is.

I don't know why I'm not happy with the end result, it does look better. Maybe I never really liked the picture and didn't know because I was just too distracted by the flashy frame. Sigh.

Wednesday, August 17, 2011

Baby Class Graduates

So my husband and I have now taken all of the baby prep classes that our hospital offers. We took breastfeeding basics, an after baby comes class, and a general child birth class. At first we weren't going to take any classes, but then I figured fine I'll take the breastfeeding class. Then for some reason I just signed us up for the other two. I'm actually really glad I did. Pretty much everyone I talked to from work said that the classes were a waste of time, but I thought they were great. I would definitely recommend them to all first time parents. I don't think I'll need to take them again for any subsequent children we may have, but I learned a lot and had a lot of fun! Plus, it was really fun to watch Brian give a baby doll a bath and diaper change! He did a great job except that he kept elbowing me in my giant stomach while doing so. I guess that was my fault for hovering, I guess I was a little anxious he'd mess it up. We also saw this hilarious video about the 5 S's to calming a baby. This guy was amazing; babies were screaming bloody murder, he did the 5 S's (or a subset of them) and the baby's eyes went all wide and crazy and then they fell asleep. He was a wizard. I'm excited to see if his techniques work, or if he's just the Cesar Millan for babies. If you're interested the 5 S's are (in this order)
1: Swaddle (tightly wrap the baby up in a blanket)
2: Stomach or Side (hold the baby on her stomach or her side)
3: Shushing/white noise (make this horrible shhhhh noise in the baby's ear as loud as the baby's crying)
4: Swinging/jiggling (jiggle the baby so her head moves around like jello)
5. Sucking (on fingers or a pacifier)
Seriously hilarious and mystifying video. I tried to find a good clip on youtube, but this is the best I found http://www.youtube.com/watch?v=Pf_Qz4G6O6Y&feature=related I especially like the cheesy music at the end.

Three weeks until my due date! Can't wait!

Friday, August 12, 2011

Fat Quarter Friday: Recycle Sign

I love crafting and making random projects, but sometimes I feel like it's so expensive. So, I've decided to start Fat Quarter Friday. I love fat quarters. They're always so fun and colorful, and if you go to Joann's on the right day you can get them for $0.99. Not a bad deal. So every Friday I'm going to post a random craft that I've done with a fat quarter or two.

This week's Fat Quarter Craft is really random. We have two trash cans out in our kitchen, one for trash and one for recycling. When we would have friends over they would throw their trash in the recycling and their recycling in the trash, so to solve this little problem we make this really fancy sign.
So this sign is really gross and ugly, and it's been up in our house for over a year now. I hate looking at it, so I decided to make something cute to replace it.

Materials:
1 Fat Quarter
2 Felt Squares ($0.23 each at Joann's)
Embroidery Thread (optional)
Tacky Spray (optional)
Some Velcro

Step 1: Find a picture online and print it out. Cut out your shape and use those pieces to cut out your felt (or other fabric). I decided to use felt because it's super easy to work with and when you hand sew it on you don't have to turn under any edges.

 Step 2: Figure out how big you want your sign to be and cut out a front and a back from your fat quarter. I used a cd to help guide my edges. I didn't really worry about cutting anything out perfectly, so I just kind of went for it.

 Step 3: Lay out your felt pieces where you want them on the fabric. Then lift up one piece at a time, spray the nasty tacky spray stuff on the back and place it back in it's spot on the fabric. I use the tacky spray so that the pieces are all in their correct spot and I don't have to worry about it while I'm hand sewing.

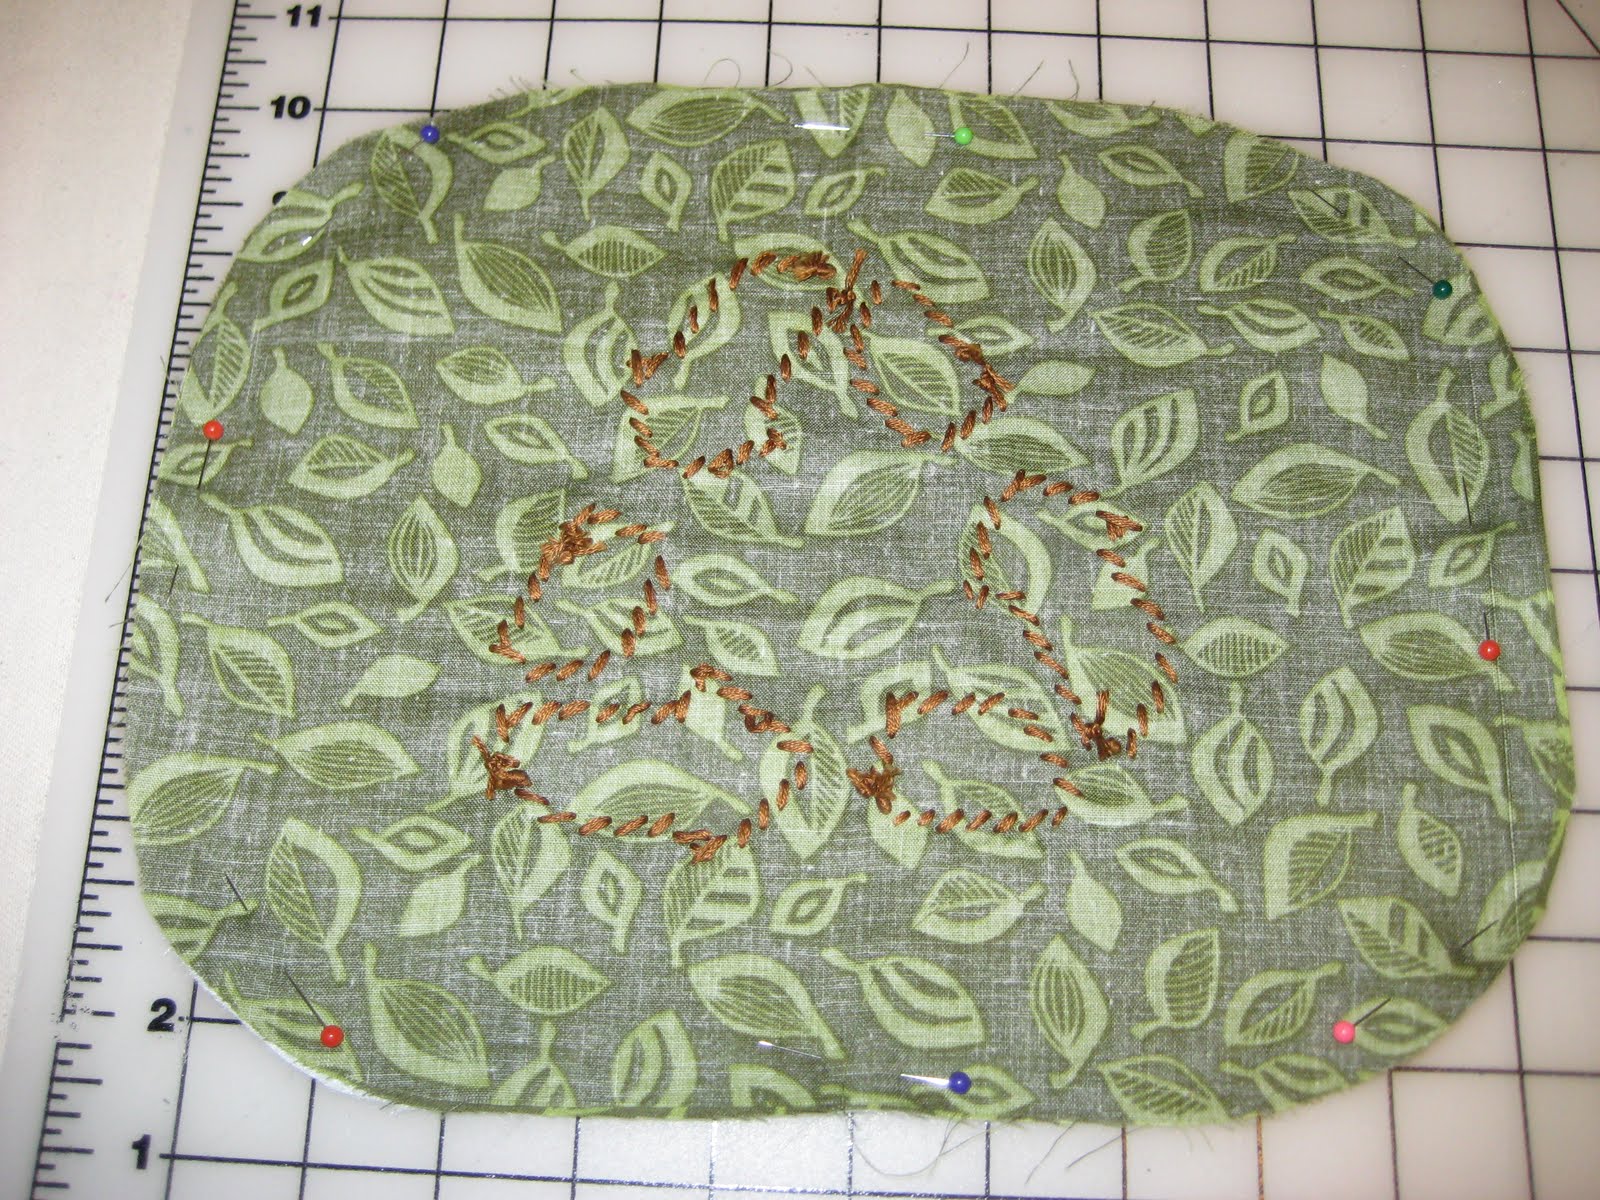
 Step 4: Hand sew around your shapes to hold them down. I used embroidery thread because I think it gives it a fun chunky look (I don't know why it looks "chunky" to me, but that's the word that comes to mind). You can use regular thread if you don't have any embroidery floss floating around your craft room.
 Step 5: Cut out four strips of velcro and sew them onto the back piece of your fabric. I decided that I wanted my sign to be a little thicker, so I threw a piece of felt in the middle. I also had this genius idea to use sticky back velcro - that way it'll stick to the trash can easily. However, sewing on the sticky velcro made my sewing machine pretty mad. I had to change the needle afterwards. I'm not sure I've every really changed the needle, so it was probably time anyway!
 Step 6: place your right sides together (don't forget your felt layer if you're using one. So it's stacked front (face down), back (face up), and then felt.) Pin everything together and sew around leaving a 3" opening somewhere.
 Step 7: Turn your sign right side out and hand stitch up the opening.
 Step 8: Attach the velcro to the trashcan lid and admire!

I know it's kind of a weird craft, but I'm pleased with how it looks and it was really fun and easy to make! It also cost less than $2 and I had 1/2 of my fat quarter and some felt leftover!

Thursday, August 11, 2011

Towel Burp Cloths

 I don't know why they insist on making burp cloths from the store extremely ugly and thin. Now, I don't actually have a baby yet, but here's what I know about babies: they are gross and leak from every orifice. Seems to me like a double layer of cheap flannel isn't really really going to cut it. So I decided to make some super-cute, cheap, and thick burp cloths.

Materials:
1/4 yd fabric (will give you 2 burp cloths)
1 old towel you don't mind cutting up

 Step 1: Cut your fabric and towel to the size you want. I cut mine to be 8"x19" (I meant to make it 8"x20", but I apparently have trouble with reading large numbers). Cutting up the towel is not the most fun thing in the world because a lot of the little loopy things get all over, but who really cares. Besides towel = free.


Step 2: Place your cut fabric and towel right sides together.
 Step 3: Sew all the way around the fabric leaving about 3 in open somewhere so you can turn the burp cloth right side out. Sewing around the fabric sounds really easy, but if you're using a thick towel it can be pretty tricky. I made four burp cloths trying different techniques, and the way that made it the least wonky was by only pinning one side at a time and then surging that side. 
 Step 4: Turn your fabric right side out making sure to poke out the corners with a knitting needle or other similarly pointy object.
 Step 5: Top stitch all the way around the burp cloth. Make sure to pinch out the sides as you do so and to fold under your 3" opening.
 Now you're done, super easy and fast! They're nice and thick and as cute as you want them to be!

To make these four burp cloths I spent a grand total of $2. I picked fabric from the red tag section, so the psychedelic window pane fabric is a little weird, but that's ok, it's way better and cheaper than the burp cloths at the baby store!

Monday, August 8, 2011

Chair Makeovers


So after wasting a few hours looking at pictures on Better After: http://betterafter.blogspot.com/ (some day I'll learn how to do these links better) I decided to put up two of my recent chair makeovers. Now I say my but I mean our since Brian did half the work. So our first little project was a rocking chair for the nursery. We found this chair on Craigslist and paid $35 for it which was $30 too much, but we drove like an hour in a blizzard to go see it, so we paid the $35.

Before:

During:
After:
I love the way this chair turned out, very sweet and simple, and very comfortable!
The next project we undertook was a $1 garage sale find. I'd been thinking that I wanted to try my hand at some true upholstering, and how better to learn than with a $1 chair that reeked of old cat lady and was covered in spiders? There probably is a better way, but this way is very affordable, and where's the fun if there isn't a little cat urine mixed in the process?

Before:

During:
After:
Pretty cute, but I think if I did this chair over again I'd pick a different fabric. It's nice and all, but a little dull. (Also, just so you know we got it to stop smelling of cat pee once the old fabric came off. Yay!).

For you naysayers out there who think "Oh I could never upholster" uh, if I can, you can. All you need is a flat head screwdriver and pliers to remove the staples, cute new fabric, a sewing machine, and a heavy duty-ish stapler from any craft store. Tip: As you take the chair apart write on a sticky note where the piece goes on the chair and in what order you took it off in and pin it to that piece of fabric. Then you'll have patterns for all of the pieces you need to cut and when you start reassembling it, just do so in the reverse order you took the pieces off!  Now go forth and upholster!