Wednesday, May 30, 2012

Swedish Pancakes

These quick and easy Swedish pancakes are a staple from my childhood (yes, I'm part Swedish, so there). Thanks mom for always making these for us!
Ingredients:
2 T butter
1 C milk
2 eggs
1/4 t salt
1/2 C flour
1 T baking powder

Step 1: Blend all ingredients well.

Step 2: Pour about 1/3 C of batter into a hot, greased skillet. Tilt the skillet around so that the entire bottom gets covered with a nice circle of batter. Flip when the one side is golden brown. Your first one will probably get all mangled, but once you do a couple you'll get the hang of it!
Step 3: Serve rolled up with butter and syrup and fruit if you like. Or if you're a fat kid at heart, do what I did when I was little: Spread butter all over one side of the pancake, then sprinkle it with sugar, then drizzle with syrup. Roll it up and pour on more syrup! I liked the way the sugar added a little crunchiness to it...yeah it sounds gross to me now too, but I swear, it was delicious!

Tuesday, May 29, 2012

Tank Top to Baby/Toddler Dress

I got this tank top for $0.10 at a church rummage sale and thought it would make a cute summer dress for Ada. I know you're not going to have the same tank, but you can use the same basic concepts and make one for your little one! It's still a little big on her, I didn't mean for it to be so revealing, but hey, if you've got it, flaunt it, right?
Step 1: The first thing we're going to do is slim up the top a bit and give it more of an A-line shape. Turn your tank top inside out and put pins along the edges where you want the new seam to go. Take in more fabric near the arm holes and less near the bottom to give is a cute A shape. Sew up your new sides.
Step 2: Turn your dress right side out again. Now we're going to make the piece across the chest the right size. We're going to make a box pleat (by making two folds that come together in the center) to shorten the width of the dress across the chest. Make your pleats bigger or smaller depending on the size of your little one. To secure your pleat sew across the two folds in two different places, making sure to back stitch.
Step 3: Now for the back and adjusting the straps. Cut the straps off the back. Make another box pleat in the center of the back so that the dress is the correct size around your tot. Pin in place.
 Take your straps and bring them down to the pleat you just made. Pull them down until the straps are the right length for your kid. (You can just guess or use another piece of clothing that fits as your guide). Pin them in place.
This picture just shows how much of the straps I didn't use. Once everything is pinned in place, sew the straps and the pleats in two different places making sure to back stitch. Trim off the excess strap fabric.
Step 4: Cut the bottom of the tank top off to the length you want. Then you can either hem it up, or if you have a serger, you can do the lettuce edge effect like I did. If you have enough fabric leftover, you can make a matching headband like I did!
Front
Back

Sunday, May 27, 2012

Weekend Sweets: Cheesecake Bites

I was trying to come up with a quick and fun dessert for my mom's graduations that looks fancy but is easy to make and I came up with these little cheesecake bites. This picture does not do them justice, probably because this picture is terrible!
Ingredients:
2 C milk
1 (8oz) package cream cheese
1 (3.4oz) package white chocolate instant pudding mix
1 package vanilla cream sandwich cookies (golden oreos work well)
cut fruit for topping
Tinfoil baking cups

Step 1: Lay all of your tinfoil muffin cups out on a cookie sheet (you want to use the foil cups because they'll hold up better than the paper ones). Place one cookie in the bottom of each cup.

Step 2: Put cream cheese and milk in a blender and mix well. Add the pudding mix to the blender, mix and let sit for a minute or two until the mixture stiffens up. When the consistency is like that of thick pudding use a spoon (I used an ice cream scoop and it worked perfectly) so plop some on to your cookies. You don't want to overfill the cups, leave about 3/4" from the top of the cup unfilled.

Step 3: Top with cut fresh fruit. I used strawberries on the trial run and then blackberries on the ones for my mom's graduation which I unfortunately did not get a picture of. Serve fairly soon after making, as time goes on, the pudding will seep into the cookie making it soggy, still good, but not as good. Enjoy!


Friday, May 25, 2012

Fat Quarter Friday: Bow Tie

For this week's Fat Quarter Friday, we have a special guest appearance: my husband. Brian actually decided to tackle this project when he (for some reason) decided that he wanted a bow tie. (Yes, my husband can sew, and yes, he's still macho.) It's based on this project by Martha Stewart, but adapted to fit within a single fat quarter.

These would make very simple, inexpensive gifts for father's day, I think, or just for fun when you feel like it. They would also be fun as a quirky addition to a wedding for the groomsmen and the ring bearer. It took my husband about an hour and a half from start to finish. Plus an extra 15 minutes to learn to tie it.

Materials:
1 Fat Quarter
Approx. 1/3 yard fusible interfacing
This Template

Step 0: A quick explanation
A large part of this tutorial is figuring out how to fit our tie onto a fat quarter when the pattern of our fabric demands that we cut "on the bias" (that is, diagonally). If your pattern doesn't need to be cut this way, you can simplify your life considerably by simply cutting 3 inch strips across your fat quarter.

Step 1:
First, cut your fat quarter to an 18 inch square. A bit bigger or smaller than this is just fine, but it should be square.

Step 2:
Cut that square in half down the diagonal, so that you have two triangles.
 Now rotate one of the triangles onto the other, so that both have the same side face up. 
 
Cut out two 3" wide strips from these two stacked triangles, followed by a strip which is 1 3/4" wide. The little triangle on the right is scrap. Set aside the 1 3/4" strips for now, we'll come back to them later.
 Now from the 3" strips, cut one end off, so that it is square. Leave the other end at a 45 degree angle.

Step 3:
Cut strips of interfacing to be just less than 3" wide. If your interfacing comes in 20" rolls like mine does, you'll need 4 strips.
Now fuse the interfacing to the strips you just cut out using your interfacing's directions. Make sure that you fuse the interfacing to the back side of the fabric. Usually, this just means steaming it under a hot iron for about 10-15 seconds.

Step 4:
Now we'll cut out the actual shape of the bow tie. Print out the pattern linked above on regular paper, and be sure that you print it at actual size. It should be 3" wide at the widest point. Cut the pattern out.

Now stack the matching pairs of strips, both with interfacing side up, and place the template on the square end.
Trace around it with a sharpie or fabric pencil, and cut it out. make sure that when you cut it out, there is no trace of your markings left - it will show through the finished product if there is. Repeat with the other pair of strips too, so that you have four bow-tie-shaped pieces, as pictured.

Step 5:
This step is sizing the bow tie. In order to size your bow tie, you'll need to know what size shirt you will wear it with. At least, for men's shirts, this should work. My husband's shirts are a size 16 or 16 1/2 neck, which I'm fairly certain is the circumference in inches. By trial and error, I found that this corresponds to a bow tie with total length 37 1/4 inches. My guess is that if you take the the neck size and add on 21 inches, you should be in the ballpark.

For simplicity, I'm going to assume that your final tie is going to be 37 1/4 inches too, but the same steps will work regardless.

First, lay out your bow tie pieces to measure them. Pair a long piece with a short piece. In this picture, mine are 36" long.

Taking into account that there will be 1/4" seams on each end of each piece (including the third piece that we are about to construct), we want our total length to be 1 1/2 inches longer than 37 1/4 inches, or 38 3/4 inches. We'll need to add a middle piece which is 2 3/4 inches on a side.

Now, you could do that, but I personally think that such a small piece is too much of a hassle to deal with. I don't want to put in a piece smaller than about 4 inches. So I actually cut down my longer pieces by a few inches, shortening the total length to 32 inches instead of 36.
This means that my third strips need to be 6 3/4 inches long.

If I had a slightly bigger square than 18 inches, or if my husband had a slightly smaller neck, I might not have needed a third piece at all. If that happens for you, it will make your life that much easier, and you can skip the next step.

Step 6:
Cut out your third strip to fit in the region between the others, with each side measuring 6 3/4 inches. Because of the diagonals, this means that the total length of the strip will be longer - just make sure that the length of the actual side is 6 3/4 inches.
You'll notice that mine are about 1/2 inch short - I forgot about the 1/4 inch seam allowances for this middle piece. My resulting tie was a bit short, for that reason, but it still fits.

Now cut and attach interfacing to these strips, just as you did for the other pieces, and we are ready to actually do some sewing!

Step 7:
Take 1 long piece, 1 short piece, and 1 middle piece, and prepare to connect them in a line. What we will do is the following: at each connection, turn the pieces as in this picture.
Sew along the diagonal. Once you have done this, you should have something like the top part of the next picture.
Press these seams open, like in the lower left of the above picture, and then trim them, like in the lower right.

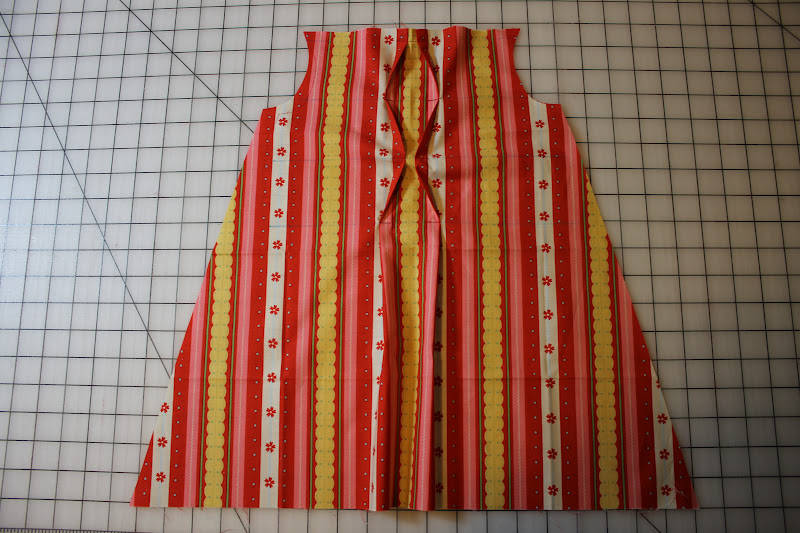
Congratulations, you now have a single long piece that looks something like a bow tie! Do it with the other pieces, and you'll have something like this:

Step 8:
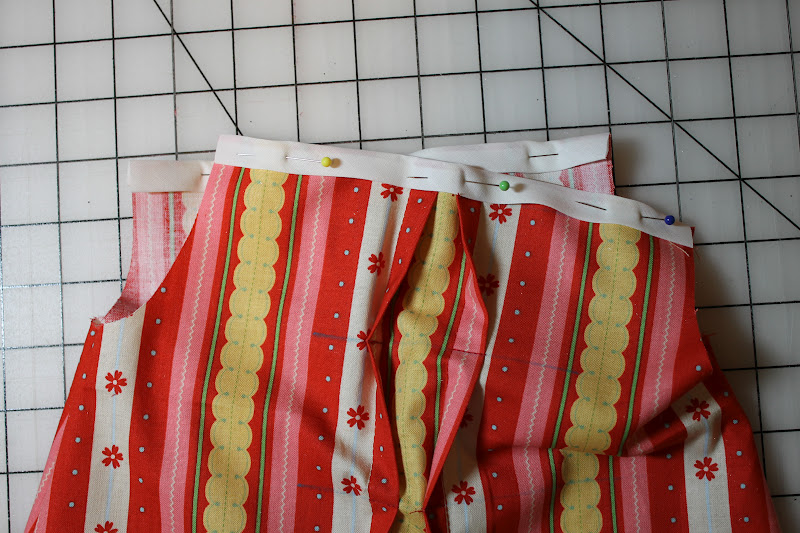
Notice how in the above picture, the seams are staggered? That's because on the top piece, the long piece is to the left, while on the bottom it is on the right. Keeping the pieces like this, place them together, with the right sides facing, and pin them together in a few places.
Sew around the edge, keeping a 1/4 inch seam, starting near one of the seams in the middle, and finishing about 2 inches before you complete the loop.
The hole that you've left is how we will turn the tie right-side out. Speaking of which, now we trim up the corners and make some relief cuts along the curves, in preparation for turning the tie.
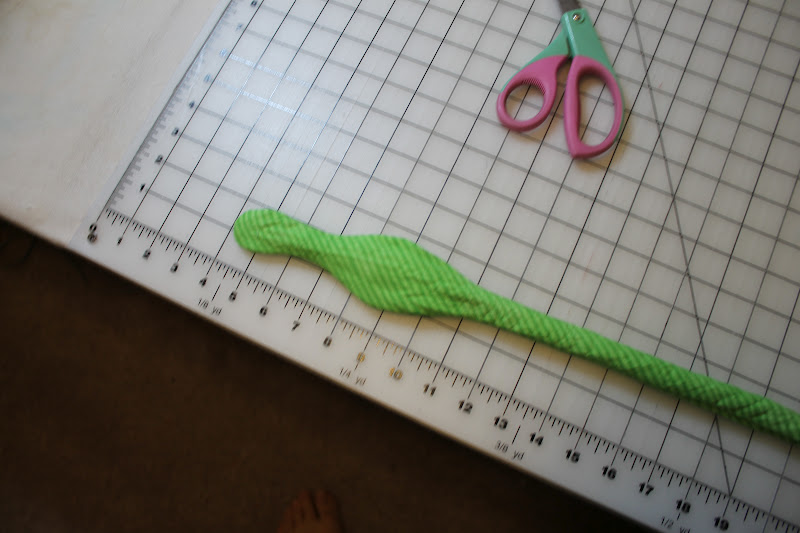

Step 9:
Turn the tie right-side out. I used the non-pointy end of a knitting needle. This is a bit tricky, but can be done. The result looks like a wrinkly, puffy snake (apologies for the blurry picture).
Using the pointy end of your knitting needle (or similar object), poke out the corners and the rounded bits, so it looks like this.
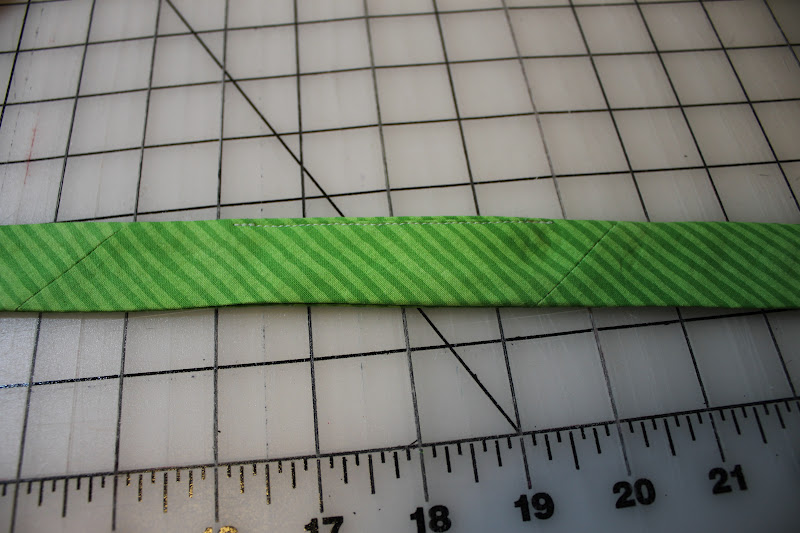
Now give it a press with your iron to see the bow tie shape. We're nearly there!
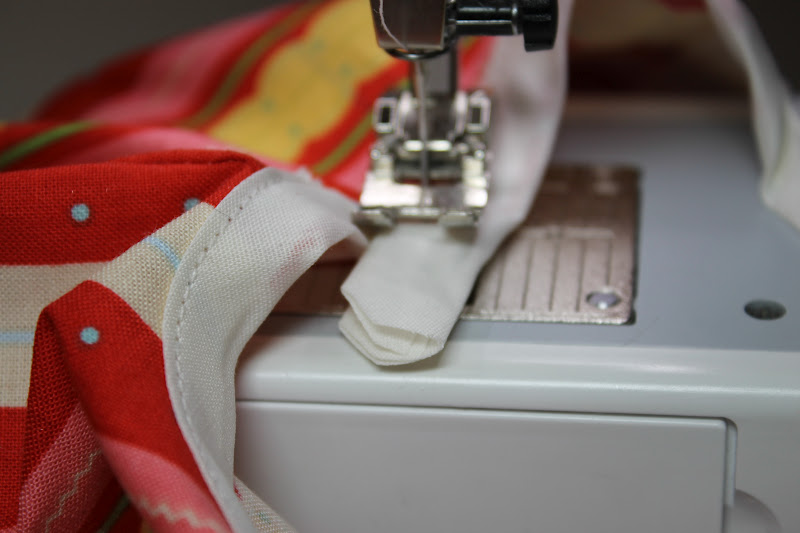
Step 10:
The last thing we need to take care of is stitching shut the opening. You can hand sew it closed with a whip stitch, but my husband really doesn't like to do hand sewing, so he just make a quick seam on the outside with a machine. It's barely noticeable, not to mention the fact that it will always be hidden beneath a collar.
You are all done! Admire your handiwork.

Step 11 (optional):
A bow tie is no good if you don't know how to tie it, though. My husband says that this site is a good tutorial. It only took him two tries to get a decent looking bow, so don't be discouraged. Practice a few more times, and you can do it too!

Sunday, May 20, 2012

Weekend Sweets: The Best Chocolate Chip Recipe You'll Ever Try

Warning: These cookies are like crack: you will always crave them and a little bit is never enough. If you have a problem with delicious chocolate, turn back now!

This is the only chocolate chip recipe my family uses. Everyone who tries them asks for the recipe. We got the recipe from this lady at my parent's church, Evelyn Jensen, whom Brian and I are seriously considering naming our second daughter after. We don't actually know her, but these cookies are just that good.
Ingredients:
1 C butter flavored crisco
1 C sugar
1/2 C brown sugar
2 eggs
2 t vanilla
2 C flour
1 1/2 t salt
1 t baking soda
1 package milk chocolate chips

Step 1: Cream the first 5 ingredients.

Step 2: Add the flour, salt and baking soda. When well mixed, add the chocolate chips.

Step 3: Place dough balls on greased cookie sheets and bake at 350 for 10-11 minutes.

Note: If your cookies are looking a little flat and weird add more flour. For some reason (probably altitude) I have to use 1/2 cup extra when I make these in IN as opposed to when I make them in CO.

Friday, May 18, 2012

Fat Quarter Friday: Pleated Baby Dress

This beautiful pleated dress was inspired by My Sparkle's Mock Smock Frock. Using fat quarters, you can make a baby dress any size 0-12 months, or a toddler/child's top.
Materials:
2 matching fat quarters
matching bias tape

Step 1: On both of your fat quarters measure and mark with a fabric pen at the following measurements from the top: 1/2", 3", 5 1/2", 8".
Step 2: Find the halfway point along the top. About 1/2" away from this point, you're going to pinch the fabric on either side of the center up about 1/2" and pin in place from the top down to your 8" marking.
You're now going to sew down each of these pleats that you made from the top down to the 8" line.
Step 3: At the 1/2" line you're going to fold the two flaps in and sew in place, then out at the 3", in at the 5 1/2", and out again at the 8", sewing the flaps down at each. Repeat steps 1-3 on the other fat quarter.
Step 4: Find a dress/top that fits your little one that you want to model after. Fold each in half like so. Place the piece of clothing on top of the fat quarter and use it as a guide to trace out the arm holes. We're going to make the shoulder straps out of bias tape, so you don't need to worry about those at this point.
Cut out your dress shape from both fat quarters.
Step 5: Place the two dress pieces right sides together, pin and sew along the sides (don't sew the arm holes!).
Step 6: Turn the dress right side out. measure the two top pieces. Cut corresponding lengths of bias tape, pin and then sew in place as shown.
Step 7: Using your piece of clothing from before as a guide, figure out how long you want the straps to be, mine went up about 2" from the top of the dress. Pin your bias tape in place starting at the base of the arm hole working your way up and around the shoulder and back down again. Make sure you have enough bias tape cut to have some overlap at the end. Repeat on the other arm.
Here are some pictures of how I finished the bias tape around the arm hole. Get about 1-2" away from the end, stop and lift your sewing machine foot with the needle down.
Clip the bottom corners of your remaining bias tape.
Fold them under,
sew across, and then finish the seam by going up the edge as well.
Step 8: Hem the bottom and you're done!