It's that time!
In case you missed my last post, I've switched hosting from Blogger to Wordpress. Hopefully, you were automatically re-directed - but if not, just go to awaitingada.com to see all my latest news and tutorials.
Thanks so much for making my blog so popular that I had to move to better hosting!
Skyler
Sunday, December 2, 2012
Sunday, November 25, 2012
Where Are You?
Ok, so I know I missed FQF (which stinks because I have a super adorable thing I made) and I'm going to miss weekend sweets, but it's because I've met my image quota here on blogger so I'm switching over to a self-hosted blog with a new look! See you again really soon (hopefully by next FQF)! Thanks for reading!
Tuesday, November 20, 2012
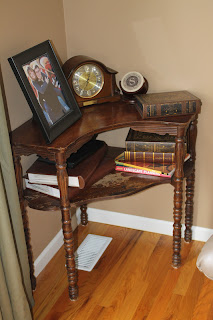
Corner Table Makeover
This great little corner table was given to me by my parents when I moved out of the house. I love it's shape, but the peeling stain wasn't very appealing. I gave it a couple coats of some pretty paint and voila! Beauty! I love giving new life to old stuff!


Before = Blah...

After = Ahhh!

First I primed the table.

Then I sanded the table tops with some fine sandpaper. I also sanded in between the coats of paint too. This gives the tops a nice smooth and shiny finish.

Then I painted it with two coats of semi-gloss paint.

I'm very happy with how it turned out! I also tried to de-clutter it a bit, which I'm apparently not very good at since it's still quite cluttered. Oh, well!

Saturday, November 17, 2012
Weekend Sweets: Peanut Butter Banana Bread
This peanut butter banana bread is decadent, it is absolutely a dessert. Ada couldn't get enough of this bread, and frankly, neither could Brian or I. It's crispy on the outside and moist on the inside with the perfect combination of peanut butter and banana.


1/2 C peanut butter
1/4 C vegetable oil
1 egg
1/2 C sugar
1/4 C brown sugar
1 1/2 C flour (I used 3/4 C white, 3/4 C whole wheat)
1/2 t baking soda
1 1/2 t baking powder
1/2 t salt
1 C peanut butter chips
Step 1: Preheat oven to 350. Grease a loaf pan with shortening and then sprinkle with flour.
Step 2: Mix together bananas, peanut butter, oil, egg and sugars. In a separate bowl, mix together flours, baking soda, baking powder and salt. Mix together and add the peanut butter chips.
Step 3: Pour mixture into loaf pan and bake for 1 hour 15 minutes until toothpick comes out clean.
Recipe adapted from Six Sister's Stuff


Ingredients:
3 ripe bananas, mashed 1/2 C peanut butter
1/4 C vegetable oil
1 egg
1/2 C sugar
1/4 C brown sugar
1 1/2 C flour (I used 3/4 C white, 3/4 C whole wheat)
1/2 t baking soda
1 1/2 t baking powder
1/2 t salt
1 C peanut butter chips
Step 1: Preheat oven to 350. Grease a loaf pan with shortening and then sprinkle with flour.
Step 2: Mix together bananas, peanut butter, oil, egg and sugars. In a separate bowl, mix together flours, baking soda, baking powder and salt. Mix together and add the peanut butter chips.
Step 3: Pour mixture into loaf pan and bake for 1 hour 15 minutes until toothpick comes out clean.
Recipe adapted from Six Sister's Stuff
Friday, November 16, 2012
Fat Quarter Friday: Crib Quilt or Toddler Bed Blanket
This is such a beautiful and easy quilt to make. And, considering how
expensive quilts usually are to make, this one isn't too bad on the cost
front either! Full price on all the materials the quilt costs about $40, but you can usually get some great deals at Joann's if you take some coupons!
 Materials:
8 fat quarters
1 yard minky
1 package quilt batting (crib size)
Step 1: Iron 7 of your fat quarters (save the 8th for the binding) and put in a perfect stack like so.


 Step 2: Assemble the top by sewing the squares together in a 4x7 rectangle. Do so by putting squares right sides together and sewing along one edge with a 1/4" seam. Iron the seams to one side.


 Step 3: Cut your minky to be the same dimension as your top: 56.5"x32.5". Then lay your minky out on a flat surface with the right side down. Then place the quilt batting out on top of it. If it's all smooshed up a crunch like mine was use some weird stuff around the how to help lay it flat. Then use some scissors to trim it to size. Why yes, that is a TI-83 calculator there :) Weird side note, that calculator has the name Jessica on the inside, hmmm, who did we
 steal get that from?


 Step 5: Now we're going to make the binding. Take the scraps that you saved from when you cut the squares. Cut strips 2.25" wide and as long as there is material left over. I was able to get one strip from each fat quarter. Then, to make up the extra length needed I took the 8th fat quarter and cut four 2.5"x18" strips.

 Step 6: Then sew your binding on your quilt. I refer to this post when I have need to be reminded about binding. I'm bad a explaining binding, so go to that site if you don't know how! :)


8 fat quarters
1 yard minky
1 package quilt batting (crib size)
Step 1: Iron 7 of your fat quarters (save the 8th for the binding) and put in a perfect stack like so.

Cut out four 8.5"x8.5" squares so that you have 28 squares total. Save the scraps for the binding!

Aren't they pretty?! Note: You should iron yours better than I did :)


Lay out the pattern that you want (or go random like I did) and continue to sew until you've got the entire top put together.

Here it is, 4 squares by 7 squares.


Once your batting is trimmed to the right size, lay the quilt top on top with the right side facing up. So you should have a sandwich with the batting in middle and the top and bottom with their right sides facing out.

Pin all the layers together. Then baste around the quilt 1/4" away from the edge.

Step 4: Quilt all of the layers together by stitching in the ditch between all of the squares.


Sew the strips together in a nice long train (right sides together with a 1/4" seam which you then iron open). Then iron the long strip in half with the right sides facing out.


You're all done with your sweet and simple crib size quilt!


Wednesday, November 14, 2012
Unflattering Dress to Skirt Refashion
I've been going through my closet and taking out all the things that I like, but never wear. This dress was one of those things. It's really pretty off, but on, the dress was too big and monochromatic for my tastes. So, instead of letting it get dusty in my closet, I did a quick refashion to turn it into a beautiful skirt!


 Materials:
Old knit dress you don't mind cutting up (one with a defined waist with be easiest)
Elastic (I used no roll 1")
Step 1: Cut your dress a few inches up from where you want the skirt to start. You're going to fold part of this down, so make sure you cut high enough.
 Optional: Serge or zigzag around the edge you just cut. You don't have to do this step because it's knit fabric so it won't fray, but I did anyway.
 Step 2: Now we're going to make the casing for the elastic. Turn the skirt inside out. Fold down the edge you just serged and pin it in place where you want it to be. Make sure there's enough room for your elastic to fit. Sew in place all the way around. You can serge or zigzag it in place. Leave a 2"-3" opening for the elastic.
 Step 3: Fasten a safety pin to the end of your elastic (cut to your waist size where you want the skirt to fit) and feed it through the casing you just made.


Before and After

Old knit dress you don't mind cutting up (one with a defined waist with be easiest)
Elastic (I used no roll 1")
Step 1: Cut your dress a few inches up from where you want the skirt to start. You're going to fold part of this down, so make sure you cut high enough.


Overlap the elastic ends like so (about an inch) and sew together. Sew closed the hole you left open on the casing.

You're done!

Ta Da! Enjoy your new old clothes!

Monday, November 12, 2012
Apple Butter Quinoa Muffins - Vegan Option
Quinoa may be my new favorite thing to cook with. It's super easy and versatile, I think I may be in love with a health food. I know, gross, right? This healthy recipe can easily be adapted from just plain old healthy to healthy vegan. It's tasty, easy, and husband and baby approved. The quinoa makes the muffins crazy moist and delicious. Enjoy!
 Ingredients:
1 C whole wheat flour
1 1/4 C cooked quinoa
1/3 C sugar
2 t baking soda
dash of salt
1 t cinnamon
dash of ginger, nutmeg, and ground cloves
2 T apple butter
2 T applesauce
1 egg (or 1/4 C applesauce)
2/3 C skim milk (or rice milk)
1/2 C chopped apple (granny smith or honeycrisp are best)
1/3 C chopped walnuts
Step 1: Mix the flour, quinoa, sugar, salt, and spices together.
Step 2: Add in the remaining ingredients, applesauce, egg milk, apple and walnuts, and mix well.
Step 3: Pour into 12 muffin cups and bake at 375 for 18 minutes.
Recipe adapted from The Realistic Nutritionist
Saturday, November 10, 2012
Weekend Sweets: Chocolate Chip Oatmeal Cookies
These chocolate chip oatmeal cookies are the perfect combination of crunchy and chewy. They are pretty much amazing. Now I know why my husband loves oatmeal cookies so much!

Recipe adapted from All Recipes

Ingredients:
1 C butter (softened)
1 C brown sugar
1/2 C sugar
2 eggs
2 t vanilla
1 1/4 C flour (I did 3/4 C white, 3/4 C whole wheat)
1/2 t baking soda
1 t salt
3 C quick oats
1 C chopped walnuts
1 C milk chocolate chips
Step 1: Preheat oven to 325. Cream together butter and sugars until smooth. Gradually add in the eggs and vanilla and mashed bananas.
Step 2: In a separate bowl, mix the flours, baking soda and salt together. Then slowly add it to the banana mixture. Add the quick oats, chocolate chips and walnuts.
Step 3: Form balls and place on greased baking sheet. Bake for 12 min at 325.
Friday, November 9, 2012
Fat Quarter Friday: Baby or Toddler Mittens
It is getting super cold here, so I decided to try to make Ada some cute little mittens. I tried to make these last week, and they were a total bust. I got unreasonably upset, but I tried again this week and they turned out perfect!

1 fat quarter
minky scraps (or fleece, or something else warm)
4" narrow elastic (I used 1/4")
5" velcro
Step 1: Make a template. I used a cd for the main part of the mitten and then drew some lines straight down from it, about 2" from the bottom of the circle. See the picture of my template if that explanation is as horrible as I think it is.


 Step 3: Take one of the mitten sets and place it right side down. Take a 2" strip of velcro and sew it along one of the short ends. Then turn and sew down the length of the elastic, stretching it as you go. See the next two pictures to try to make sense of my ramblings.


 Step 4:We're now going to make the little straps for the mittens. Cut two 3.5"x3.5" squares from your fabric.


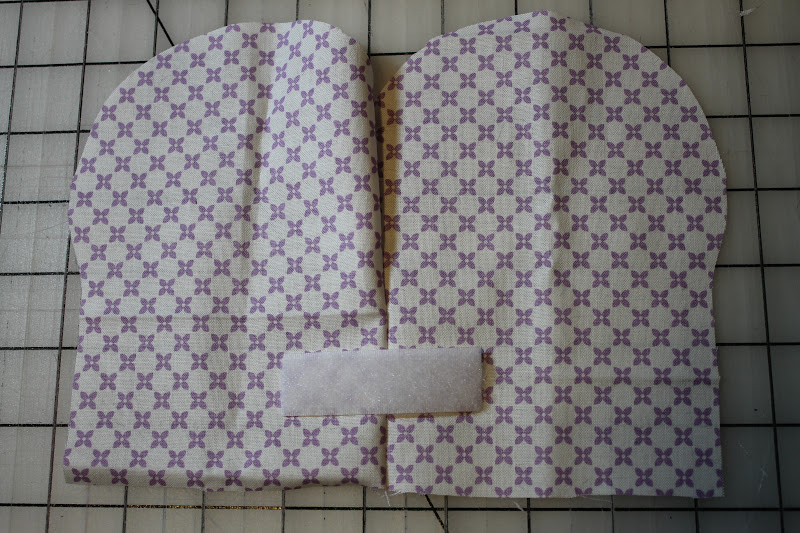
 Step 5: Lay your mitten out right side up. Take your little velcro strap you just made and place it velcro side up with the raw edges meeting up with the edge of the mitten and pin it in place.

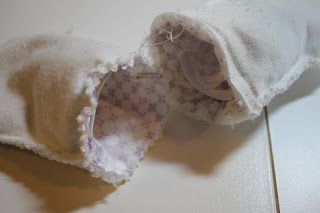
 Step 6: Cut out 4 mitten shapes out of the minky, or fleece or whatever warm stuff you want for the inside of the mitten. Place two of the pieces right sides together and sew around the edges, leaving the straight edge open and a 2" opening near the top. Repeat.
 Step 7: Take the outer fabric mittens and turn them right side out. Then place them like so above the inside out mitten insides and then shove them inside of the mitten linings.


 Step 8: Pull the mittens right side out through the opening your left in the lining, then shove the lining inside the mitten shell.


Doesn't she look so happy to wear them? Or you know, super pissed.
Materials:
1 fat quarter
minky scraps (or fleece, or something else warm)
4" narrow elastic (I used 1/4")
5" velcro
Step 1: Make a template. I used a cd for the main part of the mitten and then drew some lines straight down from it, about 2" from the bottom of the circle. See the picture of my template if that explanation is as horrible as I think it is.

Cut out four of the mitten shapes from your fat quarter

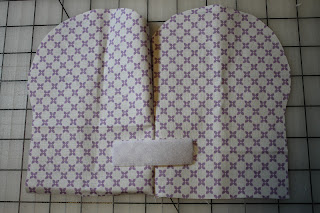
Make two sandwiches with the right sides together and sew along one side of each as shown in the picture.

Open up the partially sewn mitten and place a 2.5" strip of velcro (the fuzzy side) over the seam like so. Position it about 1" up from the bottom edge and sew in place. Repeat on the other mitten.

Start at one end

and stretch the elastic as you sew down the length.

Now it gathers up nicely on one side. Repeat on the other mitten.


Fold the square in half right sides together and sew along two of the edges leaving one of the short ends open (1/4" seam). Clip the corner.

Turn the rectangle right sides out and topstitch 1/8" away from the edges along the three finished edges. Then place the velcro like so and sew in place. Repeat for the other strap.


Fold one of the sides of the mitten over on itself (right sides together) and sew around the outside with a 1/4" seam leaving the straight edge open. Clip around the curved parts, or use pinking shears. Repeat with the other mitten.


Wiggle everything around so that the side seam meet up and the raw edges meet up and then pin the layers together.

Then sew around the openings with a 1/4" seam.


Topstitch around the opening with a 1/8" seam.
You're all done!
Enjoy your mitten paddle hands!

Subscribe to:
Posts (Atom)