Monday, October 31, 2011

Halloween

Happy Halloween everyone! I'll be the first to admit that I love holidays, Halloween included. Unfortunately, this Halloween we didn't really have an excuse to dress up since nobody was having a party, and Ada's too young to go trick or treating. That didn't stop me from decorating, or making Ada dress up! I included pictures of some of the Halloween decorations that I've made.

This Halloween quilt is new this year (thanks mom!). I just finished the top today, so we can't actually use it just yet, but it's still pretty cute!
 This is my jack-o-lantern wall hanging, it's one of my favorites!
 Last year Brian and I didn't have a candy bowl, so we covered this nasty old wicker basket with festive fabric! Yum! (I haven't eaten any of this batch of candy, go me!)
 Here's my adorable husband with grumpy pumpkin Ada.
 Check out that double chin, looking good!

Friday, October 28, 2011

Fat Quarter Friday: Travel Changing Pad

This week I decided to make a new changing pad for my diaper bag. The one it came with is floppy, bulky, and already has a rip in it, so fat quarter friday is here to save the day!
Materials:
1 Fat Quarter
Some minky, fleece, or flannel (whatever is soft that you have lying around, roughly 24 x 16 in)
Thin ribbon (1/8 in) or yarn
Needle with an eye big enough for your ribbon or yarn

Step 1: Place your fat quarter and your minky right sides together and cut to size. I just made mine roughly the size of the changing pad that came with my diaper bag, about 24 x 16 inches. 

 Step 2: Pin together and sew, leaving a 3-4 inch opening at one end. I have a zillion pins in this because I stink at sewing minky, it always pulls funny as you can see in the picture below. (Note: If you want your changing pad to be a little thicker, at this point add some quilt batting on top of your sandwich before you pin, and then sew around.)

 Step 3: Turn your pad right side out and sew up the opening. I hand stitched mine together, but you can quickly sew it with your machine. Now do a top stitch around the edge of the mat about 1/8 inch from the edge. You could get to this point and call it good, but I wanted to do something to it so that it was a little more interesting and stable.

 Step 4: We're now going to put some ties on our little changing pad. Use something small like buttons to visually lay out where you want your ties to go. You can have as few or as many as you want. Once it looks good to you, mark where each button was with a fabric pencil.
 Step 5: Thread your needle with your ribbon. Start with your fat quarter side up and punch down through to the soft side.
 Push the needle right back up to the fat quarter side about 1/8 - 1/4 inch away from where you came out.
 Now you should have your ribbon with both tails up on the fat quarter side.
 Tie a knot with your ribbon and cut off the ends to your desired length.
 Repeat on all the marks you made.
 Admire your work! It looks like it belongs doesn't it? The nice thing about this changing pad is you can just throw it in the washing machine when it gets dirty. My other one was a wipe off one, which kind of grosses me out. Enjoy!

Thursday, October 27, 2011

Easy Jersey Onesie Dress (with embellishment)

A few months ago I promised to put up the tutorial for the jersey onesie dress that my mom showed me how to do, and I'm finally doing it. Every time I went to JoAnns I would look at their jersey to see if there was anything I liked and there never was. So when I was going through my closet getting rid of some shirts that were either too small or too young for me, I decided to keep a few of them for jersey projects! Best idea ever!
Materials:
A onesie
Some jersey fabric (you'll need an 18 inch square for the skirt and a 5 x 8 inch rectangle for the embellishment).

Step 1: Cut your jersey to size: an 18 inch square. I cut mine out of a t-shirt, so I'll show you how I did it, but it's pretty easy.


Make a vertical cut 9 inches from the edge, and cut off the bottom. I didn't show this part, but also cut off the top so that it measures 18 in from top to bottom.
 Now you can fold your rectangle you have into a 9 x 9 in square.
 Step 2: You're going to make two cuts in this step. The first cut you should make is along the two sides that are all the way open, meaning you can see all four layers. Make a nice curve from one corner to the opposite corner. The second cut you're going to make is on the corner that is most folded up, this will be across from the large curve you just made. You're going to want to make a small curved cut (start smaller than you might think, you can always cut more if you need to).
 This is how you're going to check to see if your little curved cut is the right size. Open up your folded up square one time like so.
 Bend the sides down so they make a straight line.
 Place your onesie on top to see if the line of the jersey skirt is the same size as the waist on your onesie. If it is move on to the next step, if not, fold it back into that square and cut off a little more.
 Step 3: This part is the same as the other onesie dresses. Make sure your skirt is inside out and lay it out on the table in front of you. Slide the head of the onesie down through the skirt to the waist. (If you want you can mark the waist on the onesie both on the inside and the outside before you do this part so that everything lines up just right. I didn't because I've made a bunch of them, so now I just kind of wing it.)
 Step 4: Fold down the bottom of the onesie around the top of the skirt. Pin in place and sew all the way around. Give yourself enough of a seam so that you're sure you got the skirt.
 Step 5: Flip the skirt down and you're done! If you think the dress looks a little plain, add some embellishment!

Tuxedo Ruffles from Sutton Grace (my favorite blog I follow). I used her tutorial posted here !

Step 1: Cut five 1 inch strips of fabric out of jersey. One 8 in long, two 6 in long, and two 5 in long.
 Step 2: Use a basting stitch and sew a straight line all the way down the middle of each strip. Pull on the threads to gather them up. Lay them out on the table in the order they are going to go onto the onesie: short, medium, long, medium, short (5" 6" 8" 6" 5")
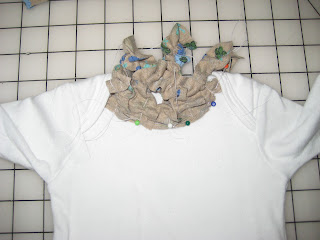
 Step 3: This is the hardest part of the ruffles. Take the longest ruffle and place in face down on the center of the onesie neckline. You want to put it about 1/4" below the edge of the bound neckline and pin it in place. Then on both sides of the longest ruffle you're going to pin on the medium ruffles in the same manner, and then pin on the short ruffles on the ends. Now sew along the edge of the lined up ruffles just under the top bound edge of the onesie. (This is going to be right along where you see the pin heads in this picture.)
 Step 4: Now you can flop the ruffles down. Take the middle ruffle and pin it down the center of the onesie. Sew a straight line down the center of the ruffle (this will most likely go right over your basting stitch on each ruffle). Repeat with each ruffle.
 You're done! Doesn't it look cute and more like a finished project with the embellished neckline?! I can't wait to try out some of Erin's other embellishments.
 Here's Ada sporting her cutie new dress. Looking good baby!

Tuesday, October 25, 2011

Tuesday Weigh In - Week 6

Belch, this week was pretty bad, not only did I not really follow my goals, I gained weight. Surprisingly enough I'm more motivated than ever! It's been six weeks since Ada was born, so I can start doing real workouts. I started a pilates class with my friend Melissa, and am going to start some other workouts as well. Also, I love my new skirt! It's also from Down East Basics, check out some of their great stuff here.

Previous weight: 182.5 lbs 
Current weight: 183.5 lbs 
This week's weight loss: +1 lb
Total weight loss: 29.5 lbs

Last Week's Goals:
1. Drink a glass of water for each soda I have.
Mostly met. This goal is great for me because it's easy and hard at the same time. When you think about it, you think that's a no brainer, but when you love diet coke as much as I do and dislike water, it's actually kind of tricky. Most days I did well and met my goal, but there were others where I didn't.
2. Don't compulsively snack when I'm not even hungry. I'm a social and an emotional eater, so I find myself eating a lot when I'm not even hungry.
Not even close to met. Umm, I ate a lot of candy and cookies this week. It's impossible to not eat candy when it's sitting out in a bowl and I feel entitled because it's so close to Halloween. Also, my wonderful husband made tasty peanut butter blossoms! Yummy!

This Week's Goal:
Complete Week 1 of the Biggest Loser 30 Day Jump Start video. It's basically 10 minute workouts six days a week. It's harder than it sounds!

Friday, October 21, 2011

Fat Quarter Friday: Checker Coasters

This week's fat quarter friday is super easy and cute: checker coasters! Using two fat quarters will make four coasters.

Materials:
2 Fat Quarters

Step 1: Iron your fat quarter and cut into 5x5 in squares: 12 squares from each fat quarter, so 24 squares total (I only have half of the squares showing).
Step 2: Iron 8 squares of each fabric in half, right side out.
 Step 3: Layout the coaster sandwich. Take one of the halves, fabric number 1, and lay it ironed edge on the left.
      Lay the next piece, fabric number 2, and lay it on top as shown with ironed edge at the bottom.
      Next, place another piece of fabric number 1 as placed with the ironed edge on the right.
      Finally, lift the bottom part of fabric 1 that is located at the bottom right.
      Place the last piece of fabric 2 on the bottom part of the square you are forming with the ironed edge on top. Flip down the flap on the bottom right that you flipped up.

      Place one of the non ironed squares, wrong side up on top of your checkered square.
     To finish up the sandwich, place another of the non ironed squares face up on top.
 Step 4: Sew all the way around the sandwich. Be careful not to let anything shift. You can try to pin it if you want, but I thought it was easier to keep it all together with out pins. When you're done, snip off the corners.

 Step 5: Put your finger in the hole in the middle and flip your coaster inside out.

Step 6: Repeat three more times to finish up your coaster set!