Materials:
Old suitcase
Spray adheasive
Hot glue
Glossy mod podge (optional)
Fabric (how much depends on the size of your suitcase, but 1 yard should be enough)
1/2" Ribbon (length depends on your suitcase, but I used about 4 yards)
Step 1: Find an old suitcase. We picked up this old one at a thrift store for $4. I gutted it by pulling out all of the shiny beige fabric it was lined with and gave it a febreeze bath because it smelled a wee bit musty. Make sure you're left with a smooth surface to adhere your fabric to.
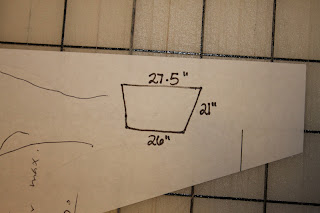
Step 2: We're going to measure to see how big to cut out new lining fabric. Measure both sides of the suitcase, measuring from the top of one side down to the middle and then back up to the top of the other.
I ended up
with two trapezoids. The I drew a cute little trapezoid and jotted down the measurements so as not to forget them.
Step 3: Cut out your fabric based on the measurements you took.
Test fit the fabric into the suitcase right side down (my fabric doesn't have a right and wrong side, so that's why mine looks like I didn't do this step). The corners should bunch up funny
Pinch them together like so until they fit right
and pin the corner where you pinched it.
Do this with all four corners.
Then sew the four corners that you pinned and trim off the extra.
Step 4: When you've sewn the corners and test fit both linings, you're going to use some sort of adhesive to get the lining to stick to the suitcase. I used a spray adhesive, but I think lots of different things would work. After I stuck the lining in the case, I put on a layer of glossy mod podge over the all the fabric. This makes it shiny and stiff, which is the look I was going for, but you can skip this part if you want the fabric to stay more fabric-y.
Step 5: I then hot glued some ribbon around the edge of the lining to give it a finished look.
All done!


This is so cute! I have a few suitcases I want to line, thanks for the tips.
ReplyDeleteSue