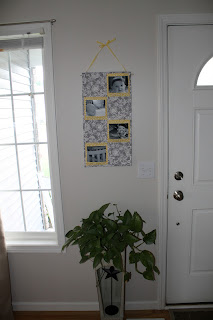
Materials:
4 fat quarters (2 for the front squares, 1 for the backing, and 1 for the binding)
Quilt batting (12.5"x24.5")
Step 1: Pick two of your fat quarters for the front. Cut four 6.5"x6.5" squares from each.
Step 2: From one of the fabrics from step 1 that you want to be the picture holders cut four 2.5"x6.5" rectangles.
Iron them in half hotdog style with the right sides facing out.
Place them along the bottom edge on the same fabric squares from step 1 so that the raw edges meet up with the edge of the square.
Sew in place 1/8" from the edge on each side.
Step 3: Assemble your front panel by sewing the squares together, first in pairs. Make sure that your little rectangles from step 2 are all situated at the bottom and that your pattern alternates like in the picture. Iron your seams toward the non-picture squares.
After you sew your pairs together, iron the seams down.
Step 4: We're now going to make out binding from another fat quarter (I had two of the same which is why it's the same color as the squares). We'll need enough to go around the perimeter of the wall hanging which currently measures 12.5"x24.5". That means we need over 74" of fabric 2.25" wide. Cut and sew strips together until it's 80" long (this should be 4 strips cut long ways from the fat quarter) and iron open the seams.
Fold the long strip in half lengthwise and iron.
Step 5: Now we're going to make the back. Our fat quarter isn't going to be big enough, so we'll have to piece it together. Take your fat quarter and position it so the long sides are vertical and cut it so it's 12.5" long.
Cut the leftover piece to be 12.5" as well and then sew it to the big piece.
Iron the seam to one side and cut the rectangle so it measures 12.5"x24.5". Also, cut your quilt batting to be 12.5"x24.5" as well.
Step 6: Now we're going to layer our top, batting and backing together like so with the right sides facing out.
Pin it in place all around the sides and in the middle as well to keep the layers from shifting.
Stitch in the ditch between the squares on the top.
I also sewed around the outside edge with a 1/8" seam to hold the edges together.
Step 7: Now I'm going to make a small casing on the back to thread through some ribbon to hang the quilt, as well as something stiff like a dowel to help it lay flat. This step is optional and I just made it up at the end, so it's not the best, but it works well. From your leftover backing fabric cut two rectangles, mine were 2.5"x8.5". Don't worry if they aren't that long.
Sew them together, iron the seam and trim so that the strip measures 12.5" long.
Turn the strip wrong side up and turn the short side under 1/4" and then 1/4" again and sew it in place.
Repeat on the other short end.
Fold it in half hotdog style with the right sides facing out.
Position it on the top back of the wall hanging and pin in place.
Sew 1/8" along the top to hold it in place.
Step 8: Using your favorite method, bind your wall hanging with our binding strip from step 4. Here is a good tutorial if you're unfamiliar with binding.
Attach a ribbon and dowel if you want, add pictures and hang it up!


No comments:
Post a Comment